Lamb & Beef Kefka

I love to experiment with different cuisines, flavors, spices and techniques in the kitchen. Sometimes I’m trying to recreate something similar that we enjoyed at a restaurant or that I’ve seen on tv. And while I know it’s easy to follow a recipe, I love to try making it totally on my own. This brings us to my latest – lamb and beef kefka! I love Mediterranean food and I recently received these great grilling skewers as a gift from my sister…seems like a perfect storm, right? Grab your pitas and the typical fixings and give this one a try.

LAMB & BEEF KEFKA

Ingredients

  • 1 Lbs. Ground Lamb
  • 1 Lbs. Ground Beef
  • 1/2 Cup Onion – finely diced
  • 4 Cloves Garlic – minced
  • 2 Tbs. Chopped Fresh Parsley
  • 2 Tbs. Chopped Fresh Mint
  • 1/2 Tsp. Salt
  • 1/2 Tsp. Pepper
  • 1/2 Tsp. Ground Allspice
  • 1/2 Tsp. Ground Cinnamon
  • 1/2 Tsp. Ground Cumin

Instructions

  • Put all ingredients in a bowl and mix well by hand. You can use leaner beef in this recipe, but I recommend 80/20 for the best taste.
  • Cover bowl and place in refrigerator for 2-4 hours.
  • Remove mixture from refrigerator and separate into 3 or 4 equal portions.
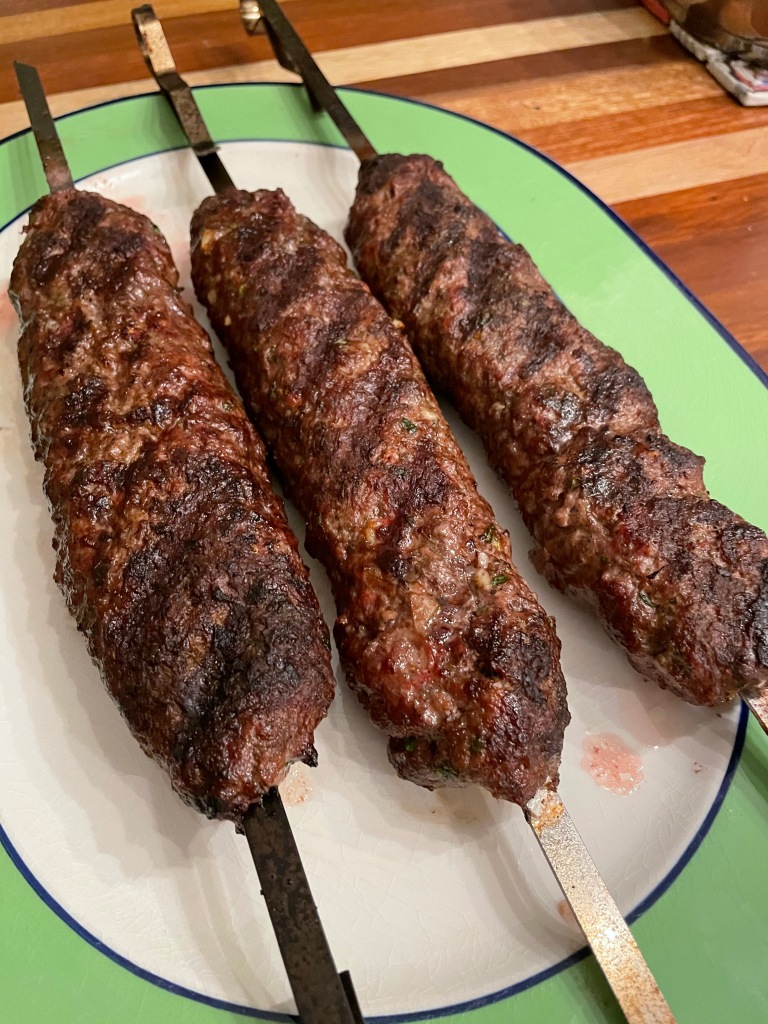
  • Using flat metal skewers (round ones will only cause the meat to spin when you try to turn them) form each portion of meat into a 7-8″ long tube. You’ll want these to be no more than 1 1/2″ inches thick and formed tightly around the skewer. They should be slightly flat rather than round for more even cooking.
  • Grill skewers over medium-high heat 4-5 minutes per side or until your desired doneness.
  • Remove meat from grill and serve immediately.

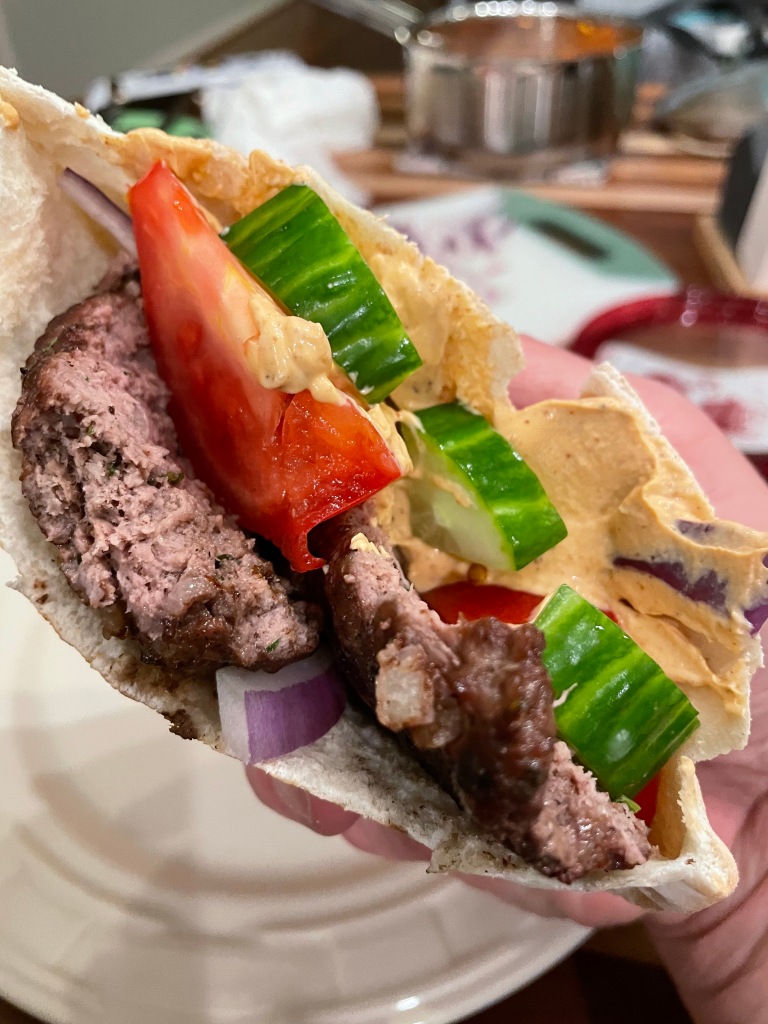
You can definitely eat the Kefka on its own with some butter & turmeric rice. However, I love putting these in warm pita with cucumber, tomato, onion and a dollop of harissa-spiced Greek yogurt. Either way, you’ll be transported to a far-away, and delicious, place. Dig in!

Advertisement

Peach Blueberry Skillet Crisp

There’s something to be said about using the freshest in-season ingredients when you’re cooking – what good chef or home cook doesn’t?  We’re lucky enough to have a fantastic farm share that we subscribe to weekly and get deliveries of the best produce in the area.  Last week we managed both blueberries and peaches and I just had to mix up this quick delicious dessert.

IMG_2052

PEACH BLUEBERRY SKILLET CRISP

Ingredients

Filling:

  • 5-6 Medium Peaches
  • 1 Cup Fresh Blueberries
  • 1/4 Cup Flour
  • 1/3 Cup Sugar (a little less if your fruit is ripe and sweet)
  • 1/2 Tsp Vanilla Extract
  • Dash Salt

Topping:

  • 1 Stick (1/2 Cup) Cold Butter
  • 1/2 Cup Flour
  • 1/2 Packed Brown Sugar
  • 3/4 Cup Rolled Oats
  • 1 Tsp. Cinnamon

Instructions

  • Preheat oven to 350 degrees.
  • Peel & slice peaches and place in a medium bowl.  Wash blueberries, pat dry and add to peaches.
  • Add remaining filling ingredients, mix lightly and set aside.
  • In a large bowl mix together flour, brown sugar, cinnamon and oats.
  • Cut butter into small pieces and put in the topping mixture bowl.  Using a pastry blender or fork, mix together topping until mixture is crumbly and butter is in pea-size chunks.
  • Lightly grease a 9-inch cast iron skillet or 9×9 baking dish with butter.
  • Pour in filling and spread evenly – does not need to be perfectly level!
  • Spoon the topping mixture over your fruit and cover completely.  DO NOT press down, the topping will brown and crisp better without it being perfectly flat.
  • Place pan in oven and bake at 350 degrees for 40-45 minutes until top is lightly browned and fruit is bubbling on edges.
  • Serve warm from the oven or at room temperature with vanilla ice cream or fresh whipped cream.

E680655D-0B48-4484-8821-23A8A3C50B2D

There you are, an easy one that you can substitute with almost any fruit!  If you think this one looks good, try it with apples or cherries.  Dig in!

Tuscan Sausage & Kale Soup

We’re not quite into fall weather yet, but heading into “soup season” I wanted to try out some new recipes.  And with the glut of fresh late-summer vegetables we have, it was a no brainer to come up with this savory, but surprisingly light, Tuscan soup.  For those that aren’t kale-lovers, I bet you’ll have a hard time putting your spoon down!

IMG_1181

TUSCAN SAUSAGE & KALE SOUP

Ingredients

  • 1 Lb. Mild Italian Sausage (no casing)
  • 1 Medium White Onion, Diced
  • 4-5 Cloves Garlic, Chopped
  • 2 Tbs. Extra Virgin Olive Oil
  • 2 Large Tomatoes, Peeled & Diced
  • 1 15-ounce Can White Beans, Drained
  • 4 Cups Fresh Kale, Chopped
  • 3/4 Cup Dry White Wine
  • 4 Cups Chicken Stock
  • 4 Cups Water
  • 1 Tbs. Dried Parsley
  • 2 Tsp. Salt
  • 1 Tsp. Black Pepper
  • 1/4 Tsp. Red Pepper Flakes
  • 2 Bay Leaves
  • 3-inch Chunk of Parmesan Rind

Instructions

  • In a heavy bottom pot, add 1 Tbs. olive oil and brown sausage until cooked through and crumbly – about 8-10 minutes.  Remove sausage with a slotted spoon and set aside.
  • Add 1 Tbs. olive oil and the diced onion.  Cook 2-3 minutes until translucent and then add garlic.  Cook for 1-2 minutes.
  • Add tomatoes and any juice to onions and garlic.  Season with 1 Tsp. salt and cook for 5 minutes until tomatoes are soft and begin to break down.
  • Add white wine to the pan and use a wooden spoon to scrape up any brown bits on the bottom of the pan.
  • Add chicken stock, water, remaining salt, pepper, parsley, red pepper flakes and bay leaves. Bring to a simmer, about 5 minutes.
  • Stir the kale into the hot liquid and simmer for another 5-7 minutes.  Kale will soften and turn bright green, then darken.
  • Add sausage back into the pot along with the white beans and Parmesan rind.  Reduce head and simmer on low for 30 minutes.
  • Serve immediately with a sprinkle of parmesan and/or croutons.

For about an hour of work, you’ll get a rich broth and amazing flavors from this soup.  Homemade stock and fresh tomatoes are best, but using canned for either still works really well.  For a little kick, add double the red pepper flakes or use hot Italian sausage.  The Parmesan rind is optional, but gives a rich nutty flavor to the broth.  Now that we’re wrapping up summer, this recipe will serve you well through the fall months and on cold winter nights too.  Dig in!

Blackberry Cobbler

We’ve really been focused on eating more local seasonal ingredients this year and have really loved it.  The farm share we subscribe to has been amazing and we’ve tried to come up with recipes to take use such abundance!  This past weekend we visited a local berry farm and found the biggest sweetest blackberries around.  Of course, they were begging to be a dessert and we had a family fish fry/pool party Sunday that offered the perfect occasion.

IMG_1087

BLACKBERRY COBBLER

Ingredients

  • 8 Cups Fresh Blackberries
  • 2 Tbs. Lemon Juice
  • 3 Tbs. Sugar

For the topping:

  • 1 1/2 Cups All-Purpose Flour
  • 1 1/2 Cups Sugar
  • 1/2 Tsp. Salt
  • 2 Eggs, Beaten
  • 9 Tbs. Butter, Melted

IMG_1085

Instructions

  • Preheat oven to 350 degrees.
  • Wash blackberries and pat dry with a towel.  Place blackberries in a 13×9 baking dish sprayed with non-stick spray.
  • Pour lemon juice over berries and then sprinkle with 3 tablespoons sugar.  You can use more or less to taste based on the sweetness of your berries.
  • In a medium bowl, mix together dry ingredients.  Stir in the eggs until combined – the mixture should be crumbly.
  • Spoon mixture over the blackberries.  Do not press down or even out the crumbles – this is what makes the fantastic crispy bits of crust!
  • Drizzle the melted butter over the crumbled mixture and place in the oven.
  • Bake at 350 degrees for 35-40 minutes until the berries are bubbly and the topping is golden brown.
  • Serve immediately or at room temperature with vanilla ice cream.

This recipe is fairly straightforward and can easily substitute any fresh berry or combination.  I like the proportions of this recipe because it lets the fruit be the star of the show and doesn’t completely cover it with crust – save that for pies!  I’ll tell you this didn’t last long at our picnic, but if there’s leftovers keep the pan just loosely covered or the topping will get mushy.  Now get our there and pick some for yourself.  Dig in!

Portobello Personal Pizzas

When don’t you have a craving for pizza?  The fact is, most of us will save pizza for Friday movie nights, a party or some other excuse to indulge our endless craving for dough, cheese, sauce and goodies.  Trying to get in shape for an upcoming vacation has me rethinking recipes and finding ways to have my favorites without sacrificing too much.  That’s where this alliterative recipe comes in – you’re going to love it!

thumbnail_IMG_0829

PORTOBELLO PERSONAL PIZZAS

Ingredients

  • 2 Portobello Mushroom Caps
  • 2 Tsp. Extra Virgin Olive Oil
  • 1 Tsp. Dry Italian Seasoning
  • Salt & Pepper
  • 1/2 Cup Pizza Sauce
  • 2 Tbs. Diced Red Onion
  • 8 Slices Pepperoni or Turkey Pepperoni
  • 1/2 – 3/4 Cup Shredded Mozzarella

Instructions

  • Preheat oven to 400 degrees.
  • Remove gills from mushrooms with a spoon.  Wash and dry them thoroughly.
  • Place mushrooms on a baking stone or sheet.  Drizzle each with a teaspoon of olive oil.  Sprinkle with Italian seasoning and salt and pepper to taste.
  • Place in the oven and bake for 15-20 minutes, depending on size and thickness of your mushrooms.  They should darken and shrink some, but still be slightly firm to the touch.
  • Remove from oven and pat dry with a paper towel.  They release a lot of water in the initial baking and you don’t want soggy pizzas!
  • Spread each cap with half of the pizza sauce.  You can use marinara or any other jar sauced here as long as it is thick and not watery.
  • Top each cap with onions, then pepperoni and finally cheese.
  • Place in the oven and bake an additional 10-12 minutes until cheese is melted and slightly brown and bubbly.
  • Remove from oven and serve immediately.

You almost don’t miss the crust on these easy pizzas.  The good news is that your topping choices are endless – sausage, peppers, olives, etc.  As long as you like mushrooms, you’ll be thrilled with an alternative to heavy pizza that saves you both carbs and calories.  It’s also great for gluten-free friends if you watch your sauce ingredients.  Try some at home and let me know what you create.  Dig in!

Roasted Beet Salad

I have always loved beets!  Granted, as a child and into early adulthood, my exposure to beets were limited to the canned variety or pickled beets.  Both are delicious, but you can’t full appreciate the true flavor unless you roast them yourself.  Luckily, our farmers market had some this past week and I was able to make this fantastic salad.  As a side or a main, this one hits all the right notes of sweet, salty, crunchy and fresh.IMG_0771

ROASTED BEET SALAD

Ingredients

  • 4 Medium Red Beets
  • 6 Cups Spring Lettuce
  • 4 Ounces Semi-Soft Chèvre (Goat Cheese)
  • 1/2 Cup Roasted Pistachios
  • 8 Tbs. Ken’s Raspberry Walnut Vinaigrette
  • Fresh-cracked Black Pepper
  • Flaked Sea Salt

Instructions

  • Preheat oven to 400 degrees.
  • Trim and wash beets thoroughly to remove dirt.  Do not dry them!  Wrap each wet beet individually in aluminum foil.
  • Place beets in a shallow baking dish or 9×9 pan and bake for 1 hour 15 minutes.
  • Remove beets from oven and allow to cool about 1 hour or until you are able to handle.
  • Remove beets from foil.  Unless you want red hands, wear rubber gloves and carefully peel each beet with a knife.  The skins will come off easily like a roasted sweet potato does.
  • Dice each beet into 1-inch cubes and place in a glass bowl.  You can refrigerate or use them at room temperature for this dish.  I prefer them chilled.  (HINT:  you can peel and dice beets with a pair of tongs and a knife, but be careful!)
  • Assemble 1 1/2 cups of lettuce mix on each of four plates.  Drizzle each plate with 2 Tbs. (or less) of the vinaigrette.
  • Arrange 1/4 of beets on each bed of dressed lettuce.
  • Sprinkle each salad with 1 ounce Chèvre and 1/4 of the pistachios.
  • Top each salad with fresh black pepper and sea salt to taste.
  • Serve immediately.

It sounds pretty simple, but the star of the show is the beet!!  I recommend the salad dressing above, but you can easily make your own light vinaigrette.  I recommend a fruity vinegar as it helps bring out the flavor and sweetness of the beets.  I enjoyed this for an easy lunch at home or topped with seared salmon for dinner or it would be a dazzling starter for your next dinner party – how gorgeous would this look on a large platter?!  Enjoy the bounty and eat those red and yellow beets while you can get them fresh.  Dig in!

Bacon Parmesan Stuffed Mushrooms

I’m constantly looking for and creating new small bites for holidays, parties, Sunday suppers, tailgates, etc.  Who doesn’t love an afternoon or evening of cocktails, cold beer and appetizers??  I like to make things that don’t require a ton of work, but taste like a million bucks with the convenience of friends/guests being able to grab-and-go with something.  Think of it as “what can I pick up and eat while never putting my drink down”!  Behold, the best stuffed mushrooms below…

thumbnail_image1

BACON PARMESAN STUFFED MUSHROOMS

Ingredients

  • 2 Quarts White Button Mushrooms
  • 2 8-ounce Bricks Cream Cheese
  • 6 Ounces Real Bacon Bits
  • 1/2 Cup Grated Parmesan Cheese
  • 1 Tbs. Parsley Flakes
  • 1 1/2 Tsp. Garlic Powder

thumbnail_IMG_1582

Instructions

  • Lay out cream cheese to bring to room temperature.
  • Preheat oven to 375 degrees.
  • Wash and stem mushroom.  If there are thick ribs on the underside, scoop out with a spoon.  Place on paper towels and blot dry.
  • In a medium bowl, use a hand mixer to mix cream cheese, bacon bits, parmesan and garlic powder until well combined.
  • Using a spoon, fill and smooth a teaspoon or more of filling in each mushroom.  These should be mounded, but not overfilled.  A good rule of thumb is that the filling should be about 1/3 to 1/2 the size of the mushroom cap.
  • Continue filling and place mushrooms on a large foil-lined baking sheet.
  • Bake mushrooms at 375 degrees for 30-40 minutes until the mushrooms are cooked and the filling has browned on top.
  • Remove from oven and serve immediately.  These can also be transported but place a few paper towels in the bottom of your contained as they will seep liquid as they cool.

You’re going to love the earthy, creamy and salty bite of these mushrooms!  The recipe above will fill a large cookie sheet, but you can easily cut this recipe in half or double it depending on your event.  Oh, and if you have any filling left over, it’s ridiculously good on a toasted everything bagel.  Now go get that party started.  Dig in!

Garlicky Roasted Cauliflower

It seems like cauliflower is everywhere these days!  From pizza crust to faux fried rice to “steaks” on the grill, everyone is obsessed with it.  I’m not quite on the bandwagon wholeheartedly, but I do love it both raw and cooked.  We’re going through a kitchen remodel and have limited resources for prep and cooking.  So I came up with the recipe below to accompany grilled chops and dirty just one bowl and cookie sheet.  If you’re looking for a savory alternative to carbs for your next meal, give this smokey-garlicky recipe a try!

IMG_0601

GARLICKY ROASTED CAULIFLOWER

Ingredients

  • 1 Medium Head Cauliflower
  • 3 Tbs. Olive Oil
  • 1 1/2 Tsp. Smoked Paprika
  • 1 1/2 Tsp. Garlic Powder
  • 1 Tsp. Salt
  • 1/2 Tsp. Black Pepper

Instructions

  • Preheat oven to 450 degrees.
  • Wash cauliflower thoroughly and dry with paper towels.  Cut out the core, cut into 2″ florets and place in a large bowl.
  • Drizzle cauliflower with olive oil and stir to coat evenly.
  • Sprinkle remaining ingredients over cauliflower and stir again to coat everything in the spices.
  • Pour cauliflower onto a foil-lined cookie sheet and spread out into a single layer.
  • Place in oven and roast for 20 minutes.
  • Remove and serve immediately.

There’s no rocket science to this recipe, but simple ingredients expertly prepared always make a delicious dish!  You’ll love this side with your favorite grilled or roasted meat or fish.  Try making a variation of this using five spice powder and brown sugar instead of garlic powder and smoked paprika.  I’d love to hear other ideas you have.  Dig in!

Blueberry French Toast Casserole

Leftover bread, dinner rolls, etc. can all be put to good use in making stuffing, croutons and one of my favorites, french toast casserole.  Easy to make ahead and bake in the morning, this recipe was amped up this weekend with the addition of fresh blueberries.  Served warm with a drizzle of maple syrup and crisp salty bacon, you’ll definitely want to try this around the upcoming holidays.

IMG_0431

BLUEBERRY FRENCH TOAST CASSEROLE

Ingredients

  • 6 Dinner Rolls or 1/2 Load Bread
  • 5 Eggs
  • 1/4 Cup Heavy Cream
  • 1/4 Cup Milk
  • 1 Tbs. Sugar
  • 1 Tsp. Vanilla
  • 1/2 Tsp. Cinnamon
  • Pinch of Salt
  • 1 Cup Fresh Blueberries
  • 1/2 Cup Light Brown Sugar
  • 3 Tbs. Butter

Instructions

  • Tear bread into roughly 2-inch pieces and set aside.
  • In a medium bowl combine eggs, cream, milk, sugar, vanilla, cinnamon and salt.  Whisk together until until all ingredients are incorporated.
  • Place bread into egg mixture and toss lightly to coat evenly.  Do not over-mix or your bread will turn to mush.
  • Fold in blueberries until evenly distributed.
  • Pour mixture into a 2-quart baking dish coated with cooking spray.  Cover and refrigerate overnight.
  • Take casserole out 30 minutes prior to baking.  Preheat oven to 350 degrees.
  • Bake covered for 40 minutes.
  • Remove lid or foil and sprinkle dish with brown sugar.  Cut butter into small pieces and dot along top of brown sugar.
  • Return to the oven and bake, uncovered, for an additional 15 minutes.
  • Remove from oven and serve immediately with warm maple syrup.

It doesn’t get much easier than a make-ahead breakfast like this one.  This recipe serves four, but can easily be doubled and baked in a 13×9 dish.  Who wouldn’t want to wake up to this on Christmas morning?  Or any morning for that matter?  Dig in!