Hot Mulled Apple Cider

When the weather turns to fall, there’s a certain chill in the air even on the warm days.  It’s for cool nights like these and throughout the holidays that hot mulled apple cider was intended.  This is an easy recipe to make for an evening gathering, a tailgate or to keep on hand in the fridge for single servings. You can buy “mulling spice packets” in many stores, but this is easier and less expensive as a DIY!

img_0242

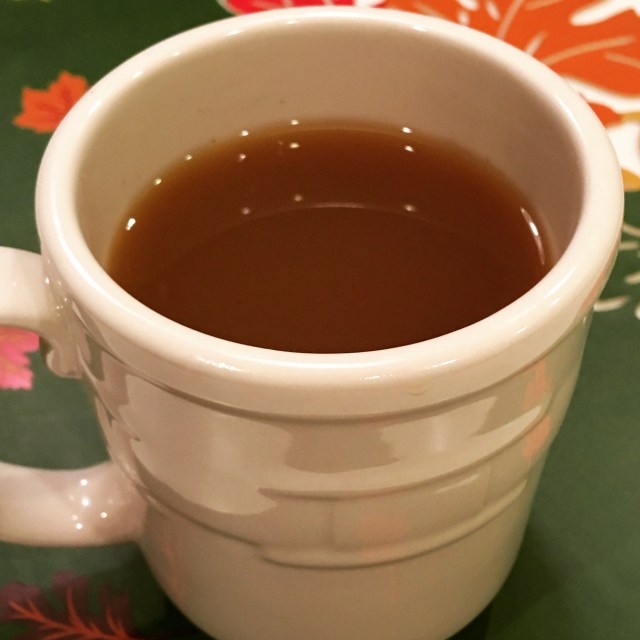
HOT MULLED APPLE CIDER

Ingredients

  • 1 Gallon Apple Cider (Filtered or Unfiltered)
  • 3/4 Cup Light Brown Sugar
  • 3 Cinnamon Sticks
  • 1 Tbs. Whole Cloves
  • 1 Tbs. Whole Allspice
  • 1 Tsp. Ground Mace

Instructions

  • Pour cider into a large pot and warm over medium heat.
  • Add brown sugar to warmed cider and stir to dissolve.
  • Add the spices and allow to steep in cider over medium-low heat for 90 minutes.  Stir occasionally and do not allow to boil.
  • Strain and serve immediately.  You can also allow to cool, strain and then store in the refrigerator for up to a week or the expiration on your cider.

This cider will warm you up snuggled on the couch, by the campfire or to start your day.  Any way you choose, you’ll love this sweet/tart/spiced treat!  I guarantee you’ll make this once and then keep some on hand throughout the fall and winter.  So, make a batch and enjoy with a few homemade snickerdoodles.  Want to make it a party drink?  Try adding a shot of spiced rum or cinnamon whisky to a warm mug – cheers!  Dig in!

Advertisement

Roasted Pumpkin Seeds

Preparing for Halloween festivities this weekend most-likely includes carving a few pumpkins.  I’m always nostalgic when doing so – scooping out the orange “guts” and then roasting pumpkin seeds.  Who doesn’t love warm crunchy-salty seeds right from the oven??  Try this recipe today or tomorrow when you’re making your scary creations.

fullsizerender

ROASTED PUMPKIN SEEDS

Ingredients

  • 2 Cups Fresh Pumpkin Seeds
  • 2 Tbs. Extra Virgin Olive Oil
  • 2 Tsp. Sea Salt
  • 1 1/2 Tsp. Garlic Powder
  • 1 1/2 Tsp. Chili Powder
  • 1 Tsp. Onion Powder

fullsizerender-3

Instructions

  • Preheat oven to 400 degrees.
  • Thoroughly wash and dry pumpkin seeds.
  • Place seeds on a foil-lined cookie sheet and bake for 8 minutes.  They should be dry and slightly toasted.
  • Remove from oven and drizzle with olive oil.  Sprinkle dry ingredients over seeds and toss on cookie sheet to evenly coat them.
  • Place back in oven and bake an additional 5-10 minutes until browned and crispy.
  • Remove from oven and cool.  They will store in an air-tight container for up to two weeks.

Enjoy your pumpkin seeds as a snack or as a great addition to salads.  Simple, delicious and a reminder of the last day of October and the beginning of the upcoming holiday season.  Dig in and be safe trick-or-treating!!

Layered Taco Dip

Who doesn’t love the crunchy-cool combo of taco dip while watching a big game?  I’ve made and eaten a lot of versions in the past, but I do love this cold combination versus a baked one.  It’s perfect for transporting or tailgating as well since you don’t have to worry about keeping it warm.

img_0221

LAYERED TACO DIP

Ingredients

  • 1 16-Ounce Can Refried Beans
  • 2 Tbs. Water
  • 16 Ounces Sour Cream
  • 1 Envelope Taco Seasoning
  • 3 Green Onions, Chopped
  • 1 1/2 Cups Shredded Sharp Cheddar Cheese
  • 1 1/2 Cups Shredded Lettuce
  • 3 Small Tomatoes, Seeded and Diced
  • 1 Bag Tortilla Chips or Fritos

Instructions

  • In a 13 x 9 baking dish, place refried beans, water and half of the taco seasoning.  Mix well and then spread into an even layer in pan.  The water helps to loosen the beans and make them more “dippable”.
  • Put the remaining taco seasoning into sour cream container and mix well.  Spread in an even layer on top of beans.
  • Sprinkle green onions on sour cream mixture.  Top with lettuce and then finally with diced tomato.
  • Cover and chill in the refrigerator for at least 1 hour prior to serving.
  • Serve with chips for dipping.

This is a popular dish every time we take it somewhere!  I do love using Fritos Scoops with it, but good sturdy restaurant-style tortilla chips are great too.  Once you taste it, you’ll know that anything you put in it is a winner!  Try it for your next tailgate or at your Halloween party this weekend.  Dig in and enjoy!

Classic Spaghetti Sauce & Meatballs

When I tell people I love to cook and write a blog they always ask, “so what’s your signature dish?”  I hate to say just one thing because I really love to cook all kinds of food.  However, my Sunday red sauce and meatballs is one of my most favorite things to make.  Who doesn’t love when the house is filled with a aroma of all-day sauce simmering on the stove??  While it requires some work, I assure you that the effort will be rewarded with a happy belly and plenty of compliments!

img_0198

MEATBALLS

Ingredients

  • 1 Lb. Ground Beef (85/15)
  • 1 Lb. Ground Veal
  • 1 Lb. Ground Pork
  • 3 Slices White or Italian Bread, Torn Into Pieces
  • 1 Small-to-Medium Yellow Onion, Finely Diced
  • 2-3 Cloves Fresh Garlic, Minced
  • 2 Eggs, Beaten
  • 2 Tbs. Dried Parsley
  • 1 Tsp. Salt
  • 1 Tsp. Black Pepper

img_0193

Instructions

  • Preheat oven to 350 degrees.
  • If you don’t like using veal, you can substitute beef.  Your mixture will then be two thirds beef and one third pork.
  • Place all ingredients in a large bowl.  Combine thoroughly with your hands, but do not over-mix.
  • Roll mixture into golf-ball sized meatballs.  Do not compact these hard, but just enough to hold their shape.  Place onto a foil-lined cookie sheet.  This mixture should make roughly two dozen meatballs.
  • Bake in oven for 30 minutes.  Start your red sauce while these are baking.

CLASSIC SPAGHETTI SAUCE

Ingredients

  • 2 28-Ounce Cans Tomato Sauce
  • 1 28-Ounce Can Water
  • 1 14.5-Ounce Can Diced Tomatoes
  • 1 6-Ounce Can Tomato Paste
  • 1 Medium Yellow Onion, Diced
  • 4-5 Cloves Fresh Garlic, Minced
  • 3 Tbs. Extra Virgin Olive Oil
  • 3 Tbs. Dried Parsley
  • 1 1/2 Tbs. Dried Oregano
  • 1 1/2 Tbs Dried Basil
  • 1 Tsp. Red Pepper Flakes
  • 1 1/2 Tsp. Salt
  • 1 Tsp. Black Pepper

img_0194

Instructions

  • In a large heavy pot over medium heat, I use a porcelain-coated cast iron one, sauté diced onions in olive oil until translucent.  Add garlic and sauce for another 2-3 minutes.
  • Add to pot both cans of tomato sauce, diced tomatoes and tomato paste.  Use one of the large cans to measure and add one full can of water.  Stir everything until combined and tomato paste is distributed.
  • Add remaining ingredients to the pot and stir until evenly distributed.
  • Bring sauce to a simmer and then lower heat.
  • ADD YOUR BAKED MEATBALLS.
  • Simmer sauce and meatballs over low heat for 5-6 hours, stirring every 30 minutes to prevent sticking.
  • Sauce will reduce and turn a deep-red color.
  • Serve over your favorite pasta and top with grated pecorino or parmesan.

img_0196

Seriously, why would you ever buy spaghetti sauce in a jar when you can make your own that’s ten times better?!  So here it is, my “signature dish” for the world to make for themselves – the secret it out!!  Dig in and enjoy, I hope you love it as much as we do!

Buttery Garlic Bread Loaf

When you have a heaping bowl of pasta, you just have to make garlic bread!  I honestly can’t stand the frozen stuff and don’t know why you’d buy it when it’s just as easy, cheaper and tastier to make your own.  You’ll never have leftovers when you make this recipe – with pasta or anything else that deserves a buttery-garlicky sidekick!

img_0199

BUTTERY GARLIC BREAD LOAF

Ingredients

  • 1 Fresh Loaf Italian or Vienna Bread
  • 1 Stick Butter, Softened
  • 2-3 Cloves Minced Garlic
  • 1 1/2 Tsp. Dried Parsley
  • 1/2 Tsp. Garlic Salt

Instructions

  • Preheat oven to 375 degrees.
  • Slice loaf of bread lengthwise and lay on top of a large sheet of foil.
  • In a small bowl, mix butter, garlic, garlic salt and parsley until combined.
  • Spread mixture on each half of bread and then place top and bottom together.
  • Wrap loaf in foil and bake in the oven for 30 minutes.
  • Remove from oven and foil and lay loaf open on a cookie sheet.  Place under the broiler for 3-5 minutes or until edges are browned and butter is bubbling.
  • Remove from oven, slice and serve immediately.

Yes, it really is that easy and that delicious.  If you’re like me, you’ll make this over and over again – your guests will request it!  With sauce, soups or steaks you’ll definitely want to dig in!!

Beef Roast With Mushroom Gravy

It hasn’t quite cooled off the way I really love for fall, but I’m starting to move to fall dishes for dinner already.  Who doesn’t love warm comforting food on a chilly October evening?  Well, one of the best recipes passed down from my mother is my favorite “mushroom roast”.  Growing up, this was a Sunday supper, but I’m good with it any day of the week.  It’s outstanding with a touch of smoke cooked in a cast-iron dutch oven over the campfire or just as good in your oven.  Either way, it’s really easy and awfully good!

fullsizerender-6

BEEF ROAST WITH MUSHROOM GRAVY

Ingredients

  • 4-5 Lbs. Beef Chuck Roast
  • 1 Envelope Onion Soup Mix
  • 2 Cans Cream of Mushroom Soup
  • 1 Pint Sliced Button Mushrooms

Instructions

  • Place roast in a dutch oven or heavy roasting pan.
  • Dust roast with onion soup mix and then toss mushrooms in and around the roast.
  • Spread both cans of cream of mushroom soup over roast and mushrooms.
  • Cover and cook for 3-4 hours at 325 degrees until fork tender.
  • Skim fat from top of cooking liquid.  Remove roast and pull apart into large chunks with two forks.
  • Serve roast on top of mashed potatoes or egg noodles and cover with thick mushroom gravy.

This rich meaty dinner will definitely satisfy your fall/winter hunger.  Even if you’re only cooking for two, it makes great leftovers for open-faced sandwiches the next day.  You can also double this for a large crowd and cook two roasts in one large roasting or foil pan – thinking ahead for the holidays already!  Give it a try and make this Sunday supper an everyday meal for your family.  Dig in and enjoy!

Tangy Bagel Dip

Football season is always a great excuse to indulge in some great fattening appetizers while taking in your favorite games.  We’ve had this bagel dip in our regular snack rotation for years!  You’ll love the creamy savory taste of this cool dip with just the right bite of garlic and onion.  Simple in ingredients, I usually offer some variances for you to try.  However, don’t mess with success on this one, it’s perfect just the way it is.

img_0159

TANGY BAGEL DIP

Ingredients

  • 2-8 Ounce Bricks Cream Cheese
  • 10 Ounces Sharp Cheddar Pub Cheese
  • 1 1/2 Tsp. Garlic Salt
  • 4-5 Green Onions, Chopped
  • 1 Dozen Bagels

Instructions

  • Place room temperature cream cheese in a bowl and mix with hand mixer until smooth.
  • Add pub cheese and mix again until combined.  Any brand works well – Kraft and many grocery store brands are available.
  • With a spatula, stir in garlic salt and green onions until distributed evenly.
  • Chill for 2 hours and serve.
  • Cut or tear your favorite bagels into pieces.  We like to use everything and onion bagels.

I suppose if you want to be a little healthy, you could always dip veggies instead of bagels.  I think celery and radishes would be great with these ingredients.  Otherwise, grab a cold beer and dig in and enjoy!