Blackberry Cobbler

We’ve really been focused on eating more local seasonal ingredients this year and have really loved it.  The farm share we subscribe to has been amazing and we’ve tried to come up with recipes to take use such abundance!  This past weekend we visited a local berry farm and found the biggest sweetest blackberries around.  Of course, they were begging to be a dessert and we had a family fish fry/pool party Sunday that offered the perfect occasion.
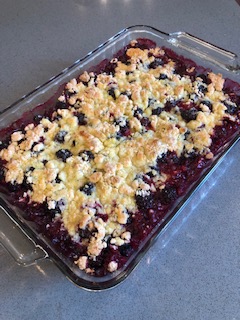
IMG_1087

BLACKBERRY COBBLER

Ingredients

  • 8 Cups Fresh Blackberries
  • 2 Tbs. Lemon Juice
  • 3 Tbs. Sugar

For the topping:

  • 1 1/2 Cups All-Purpose Flour
  • 1 1/2 Cups Sugar
  • 1/2 Tsp. Salt
  • 2 Eggs, Beaten
  • 9 Tbs. Butter, Melted

IMG_1085

Instructions

  • Preheat oven to 350 degrees.
  • Wash blackberries and pat dry with a towel.  Place blackberries in a 13×9 baking dish sprayed with non-stick spray.
  • Pour lemon juice over berries and then sprinkle with 3 tablespoons sugar.  You can use more or less to taste based on the sweetness of your berries.
  • In a medium bowl, mix together dry ingredients.  Stir in the eggs until combined – the mixture should be crumbly.
  • Spoon mixture over the blackberries.  Do not press down or even out the crumbles – this is what makes the fantastic crispy bits of crust!
  • Drizzle the melted butter over the crumbled mixture and place in the oven.
  • Bake at 350 degrees for 35-40 minutes until the berries are bubbly and the topping is golden brown.
  • Serve immediately or at room temperature with vanilla ice cream.

This recipe is fairly straightforward and can easily substitute any fresh berry or combination.  I like the proportions of this recipe because it lets the fruit be the star of the show and doesn’t completely cover it with crust – save that for pies!  I’ll tell you this didn’t last long at our picnic, but if there’s leftovers keep the pan just loosely covered or the topping will get mushy.  Now get our there and pick some for yourself.  Dig in!

Advertisement

My Favorite 7-Layer Salad

After some extraordinarily busy months, I’ve found time to get back to cooking and entertaining.  And as summer weather has landed in Cincinnati, I’m looking forward to plenty of picnics, pool parties and family gatherings!  One of my go-to dishes for any of these occasions is my Favorite 7-Layer Salad.  There are lots of variations I’ve eaten in the past, but this particular combination of ingredients and dressing put this at the top of my list.  Crisp, green and fresh, it makes the perfect side for any of your upcoming summer gatherings.

IMG_1854.jpg

MY FAVORITE 7-LAYER SALAD

Ingredients

  • 1 Head Iceberg Lettuce
  • 1 Cup Diced Celery
  • 1 Bunch Green Onions, Chopped
  • 8 Ounces Frozen Peas
  • 1 1/4 Cups Light Mayonnaise
  • 3 Tbs. Sugar
  • 1 Cup Parmesan Cheese
  • 1 1/2 Cups Shredded Sharp Cheddar Cheese
  • 6-8 Strips Cooked Bacon, Crumbled

IMG_1853

Instructions

  • Chop or tear entire head of lettuce into bite-size pieces.  Spread into an even layer in a 13×9 pan.
  • Sprinkle diced celery over lettuce.  Then spread green onions on top of celery.
  • Pour frozen peas over salad in a single layer.  Press down on first four layers to compact salad.  HINT:  I leave the peas frozen to keep the salad colder longer and it makes it easier to spread the dressing in the next step!
  • In a medium bowl, combine mayonnaise, sugar and parmesan.  Spread evenly over frozen peas.
  • Sprinkle shredded cheese over salad and finally top with bacon.

You can serve this immediate if it will be out where the peas will thaw quickly.  You can also chill in the refrigerator for up to 6 hours prior to serving.  Also, you can use regular mayo, more cheese and/or bacon to make it a little more over-the-top.  Either way, I know you’ll love using this recipe throughout the summer.  Looking for variations?  Try using white onion instead of green for a little extra bite.  Also consider swapping or adding a layer of radishes or green pepper for additional texture and flavor.  Dig in!

Cheesy Twice Baked Potatoes

I was fixing beef filet and shrimp for my wife’s birthday dinner last weekend and wanted to have potatoes as a side.  And while I love loaded baked potatoes, it’s sometimes easier and requires less stuff on your dinner table if you stir all the toppings into twice baked potatoes.  These turned out to be a family favorite in a hurry!

FullSizeRender 5

CHEESY TWICE BAKED POTATOES

Ingredients

  • 5 Medium Russet Potatoes
  • 6-8 Strips Crispy Cooked Bacon
  • 2 Cups Shredded Sharp Cheddar Cheese
  • 3/4 Cup Heavy Cream
  • 1 Tsp. Salt
  • 1 Tsp Black Pepper

Instructions

  • Throughly wash your potatoes and bake directly on the top rack of your oven for 60-75 minutes at 425 degrees.
  • Remove from oven and allow to cool enough to handle.
  • Cut potatoes in half lengthwise.  Scoop out center leaving just enough potato in the skin to hold it together.  Place scooped potato into a medium size mixing bowl.
  • Place the skins on a baking sheet.
  • Add heavy cream to potatoes and use a hand mixer to combine until mixture is fairly smooth.  There will be some lumps – like all delicious mashed potatoes!
  • Chop cooked bacon and add to the potato mixture along with half of the cheddar cheese, salt and pepper.  Stir together with a wooden spoon to prevent the mixture from becoming too gummy.
  • Fill each potato skin with a scoop of the mixture until all of it is used.  They should be filled just to the edge, but not heaping.
  • Top each potato with remaining cheddar cheese and bake at 350 degrees for 30-40 minutes until cheese is brown and bubbly.
  • Serve immediately.

You can definitely make these ahead of time and bake in the evening or the next day.  You’ll need to extend to the baking time though to allow them to warm through.  Serve these on their own or with sour cream and chopped green onion as garnish.  Maybe you’ll whip up a batch for your picnic this weekend – try using 10 small russets instead to make 20 halves.  I know you’ll love these and your guests will too.  Dig in!

The Best Egg Salad

There’s a kosher deli in Cincinnati that makes egg and tuna salad to die for.  And when I can’t get to Marx Bagels in Blue Ash, I gotta get my fix making the best I can at home.  Given the Easter holiday and a surplus of hard boiled eggs I had to perfect my own version at home.  Now, I’ll never replace the witty banter sitting at Marx’s counter, but I can definitely get on board with this egg salad recipe!

IMG_0787.JPG

THE BEST EGG SALAD

Ingredients

  • 1 Dozen Hard-Boiled Eggs
  • 3/4 Cup Mayonnaise
  • 2 Tbs. Dijon Mustard
  • 2 Tbs. Grated Carrot
  • 1 Tsp. Salt
  • 1/2 Tsp. Black Pepper
  • 1/2 Tsp. Celery Seed

Instructions

  • Peel and rinse eggs and set on a towel to dry.
  • Coarsely chop eggs and place in a medium bowl.
  • Add carrot, mayonnaise and dijon mustard and stir together until well combined.
  • Season with salt, pepper and celery seed.  Stir until incorporated.
  • Serve immediately or store in an air-tight container refrigerated for up to 3 days.

If you like your egg salad a little wetter or drier, just adjust the mayonnaise to your taste. It’s tough to not love the simplicity of this recipe on its own or made into an amazing sandwich on toasted rye or a chewy bagel.  Make some for lunches this week or for your next picnic outing.  Dig in!

Pimento Cheese Dip and BLT Dip

Memorial Day Weekend is always a blast whether you’re cooking out at home, sitting by the pool or camping with family – like we are this weekend!  There’s plenty of time to eat healthy all year long, so take the holiday opportunity to dive into these fantastic dips.  They are both fatty, decadent and will absolutely make you a hit at any party you pop in on!

IMG_1550

PIMENTO CHEESE DIP

Ingredients

  • 1 Lb Block Sharp Cheddar Cheese
  • 1 Cup Mayonnaise
  • 1 4 Oz Jar Pimentos

Directions

  • Use the largest holes on a box grater and shred cheddar cheese.  DO NOT buy shredded cheese.  The anti-caking agent and shape will not give you the right taste or consistency.
  • In a bowl, mix together shredded cheese, mayonnaise and drained pimentos.
  • This dip tastes best if you let it chill for at least 2 hours.

Serve this dip with your favorite crackers, crusty bread, celery or other veggies.  It is also delicious on top of a burger or as the filling for a grilled cheese!

IMG_1552

BLT DIP

Ingredients

  • 2 Lbs Hickory Smoked Bacon
  • 16 Oz Sour Cream
  • 16 Oz Mayonnaise
  • 2 Large Ripe Tomatoes

Directions

  • Dice bacon into small pieces and render until brown and crispy in a non-stick pan.  DO NOT use thick cut bacon here as it doesn’t provide the right consistency.  Cutting the bacon raw and then rendering makes it really easy vs. frying strips and then crumbling.
  • Remove bacon from grease and drain on paper towels.  Allow to cool completely.
  • In a mixing bowl, combine mayonnaise and sour cream.
  • Seed and cut tomatoes into 1/2-inch dice.  Add to mayo mixture.
  • Stir in cooled bacon pieces and allow to chill for 2 hours before serving.

OK, so there’s no lettuce, but BLT is what we’ve always called this dip!  It’s fantastic with Fritos, Triscuits or butter crackers.  Any way you try it, you’ll love it…and your friends/family will love you for bringing it!  Happy Memorial Day all!