Moose’s Saloon – Kalispell, MT

On our recent trip to Montana, we made our first stop at Moose’s Saloon in Kalispell.  Recommended by a couple locals, this mainstay is a must-stop before traveling 30 miles to see the beauty of Glacier National Park.

FullSizeRender 2

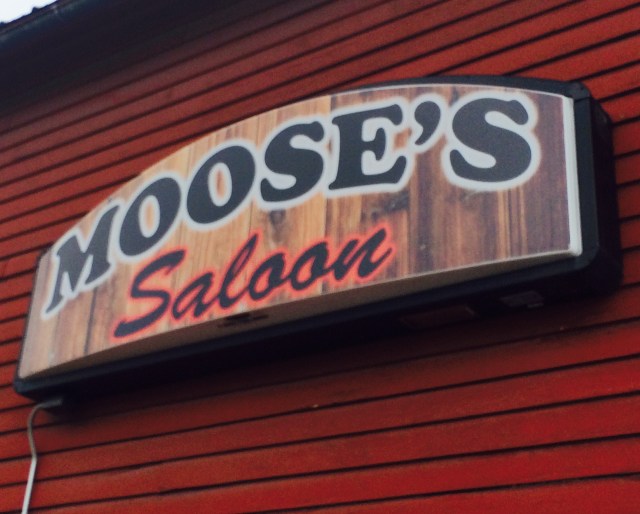
Now, you won’t find an ounce of refinement in this place, but that’s how the locals and visitors like it!  A dark loud place, the floors are covered in peanut shells and sawdust while the walls sport graffiti and license plates from the countless numbers that have walked through their doors.  There’s a great selection of beers ranging from your mainstays to local breweries – a lot of them!  Think Huckleberry Wheat or Hat Trick IPA, both were excellent!  And let me tell you, beer is cheap!!  Good thing though, because this is a cash-only establishment.  Get a glass or pitcher, find yourself a seat and crack some peanuts while you read the graffiti on the walls.

IMG_1738

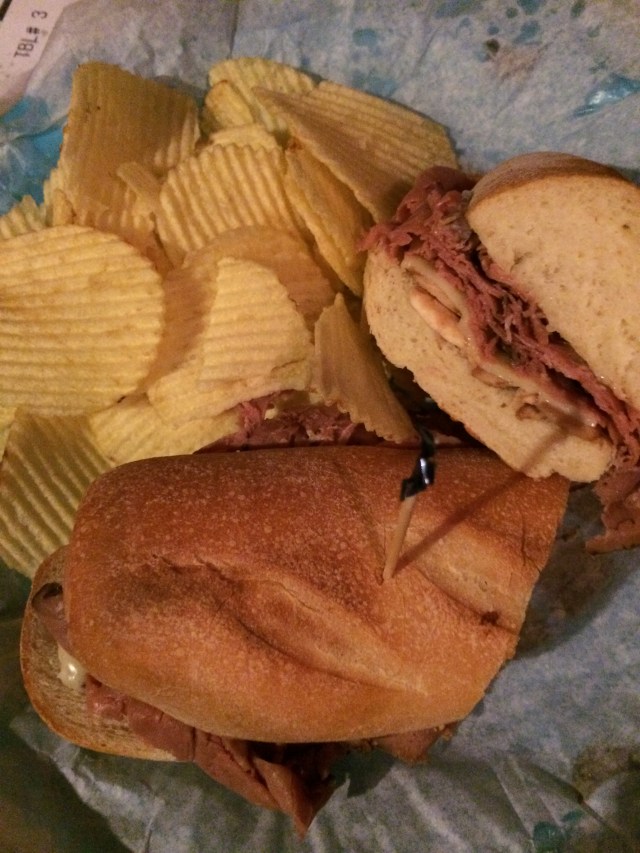
You have to order your food at a window and it will be brought out to you, so there’s not really five-star service here.  What they do have though is pretty good pizza and basic sandwiches.  My roast beef and swiss was nothing special, but a good sandwich on fresh-baked bread.  The salads were good-sized and fresh too.  It was a great starting point for our big group to begin a 10-day wilderness adventure.

IMG_1740

If you get to Northwest Montana and want a true experience, I highly recommend it.  While it’s pretty loud and had a limited menu, the place was packed with families and softball teams so you know it’s definitely a favorite.  And although we won’t get back there often, it’s one of ours now too!

FullSizeRender

Basic Pesto

We’re in the heat of summer and there’s an abundance of basil in my herb pots!  Sounds like it’s time to make some pesto – don’t worry, this is the easiest no-cook sauce in the world and will make you look like a Food Network Star!  Pesto is a versatile sauce that can be used on hot or cold pastas, chicken, fish, pizza, etc.  Start with this super-simple recipe and then let your imagination take you to some tasty places…

BASIC PESTO

Ingredients

  • 25-30 Fresh Basil Leaves, Washed & Dried
  • 1 Small Handful Fresh Parsley
  • 4-5 Cloves Garlic, Peeled
  • 1/2 Cup Extra Virgin Olive Oil
  • 1/2 Cup Pine Nuts
  • 1/4 Cup Grated Parmesan Cheese

FullSizeRender 3

Instructions

  • In a food processor (I have a small one) place basil, parsley and whole garlic cloves.  Pulse several times until chopped evenly.
  • Add olive oil and then pulse again until evenly blended.  Mixture will not be smooth, but herbs and garlic will be finely chopped.
  • Add pine nuts and Parmesan and pulse until mixed thoroughly.
  • Toss with warm pasta and/or spoon over cooked chicken or fish.  The recipe above is good for about 8 ounces of pasta, so you may need to double it for a family meal.

IMG_1969

See, I told you this was easy!  I tossed my pesto with bowtie pasta and peas and served with grilled marinated chicken thighs.  Try it as a base for pizza or a dollop in your tomato soup.  There are a ton of possibilities and a little can go a long way to add a burst of fresh flavor to your recipes.  Also, consider variations of basic pesto by using different herbs and nuts.  What about walnuts with chives and parsley?  Add a little lemon zest and juice to brighten the flavor – especially with fish.  You can also alter the amount of olive oil depending on your preference and flavor intensity you like.  Any way you make it, enjoy it all summer and fall while you have a great supply of fresh herbs!!

Bakersfield – Cincinnati

FullSizeRender

The Over-The-Rhine area of Cincinnati has been wonderfully developed over the last 5 years with a myriad of interesting shopping and food choices.  Chances are, if you’re looking for something in particular, it’s probably there!  Bakersfield was one of the early entrants in the OTR area and they have been wowing people with their Tacos, Tequila & Whiskey since they opened their doors.

IMG_1717

This location has a small patio out front with a large garage door that opens to the street.  The long narrow space provides plenty of seating, but I think we’d all be happier if there was more space in the bar.  The place is dark, loud and surprisingly comfortable.  This is not a spot for a quiet date, but perfect for lunch or dinner with a group of friends.  We started off with a cold beer from their moderate selection as well as a Spicy Margarita.  The latter will light you on fire, but I’d recommend a coupe of these mason jars of lightning to anyone stopping by!  The queso with chorizo was hot, spicy and gooey – the perfect accompaniment to the salty fresh chips.

IMG_1721

The menu has a great selection of appetizers, salads, tortas and tostadas, but they’re know for their tacos.  Order by the taco and sample several from their selection of 9 different varieties.  The food is simple, fresh and beautiful.  Our short rib, fish, steak and corn/blackbean tacos were all delicious!  I meant to try the pork belly, but couldn’t get past the first three I ordered.  I guess that’s a good excuse to stop back soon!

FullSizeRender 2

While we’re proud of our Cincinnati gem, the owners have now opened five more locations in Columbus, Pittsburgh, Nashville, Indianapolis and Charlotte.  You can read all about them and view the menu at bakersfieldtacos.com.  You can also check out their feature from Diners, Drive-Ins and Dives here.  Take a look, stop on by and be sure to bring your big-boy pants to have a Spicy Margarita!

Crispy Onion Rings

I have an undeniable love of french fries of any sort, but a crispy sweet onion ring takes fried sides to a whole new level!  Aside from the mess of frying and the oil cleanup, these onion rings are super-easy to make and turn out perfect every time.  A short bath in buttermilk takes the bite away from the onions and creates a great base for the crispy coating.  Give them a try for your Fourth of July weekend picnic or the next time you’re grilling burgers or steaks!

CRISPY ONION RINGS

Ingredients

  • 2 Large Sweet Onions
  • 1 1/2 Cups Buttermilk
  • 2 Tsp Hot Sauce
  • 2 Cups All Purpose Flour
  • 1/2 Cup Ground Cornmeal
  • 1 Tsp Salt
  • 1 Tsp Black Pepper
  • 1 Tsp Garlic Powder
  • 6 Cups Canola Oil

FullSizeRender 2

Instructions

  • Peel onions and cut into 1/2 inch slices.  Separate rings and place into a large bowl.
  • Pour buttermilk and hot sauce over the onions and toss to coat evenly.  Place in refrigerator for 1-3 hours.
  • In a bowl or cake pan, combine flour, cornmeal, salt, pepper and garlic powder.  Mix well to distribute spices.
  • Remove onions from buttermilk, about 5 at a time, and dredge in flour mixture.  Shake excess off and place onions on a wire rack.  Continue until all onions are floured and placed on rack.  You can stack these, they won’t stick together.  Allow floured onions to sit for 30 minutes – this will ensure that they stay breaded during frying.
  • Fry onions in 350 degree canola oil for 3-4 minutes until golden brown.  Turn if necessary and don’t over-crowd your frying oil!
  • Drain fried onions on paper towels and lightly salt.  You can keep them warm on a cookie sheet in a 200 degree oven while you cook them in batches.

FullSizeRender 5

You’ll be a hero when you fix these for your family and friends at your next gathering!  Try alternatives to the spices in the flour mixture or share your best dipping sauce with me.  I’m a ketchup guy with my rings, but I’m open to new ideas!  Either way, I’ve never met a ring I didn’t like…

Beer Butt Chicken

I’ve tried making beer butt/can chicken more times than I can remember over the past 10 years.  From crushed cans to underdone dark meat, I’ve made plenty of mistakes.  I’ve even read that the actual process supposedly imparts no flavor on the finished product.  Let me tell you, I have perfected the process and am telling you that this is some of the best chicken you will ever have!!  From the initial brine to the cooking liquid, your birds are assured to be moist, tender and full of flavor.  Give this recipe a try and you’ll believe me.

BEER BUTT CHICKEN

Ingredients

Brine

  • 4 Cups Water
  • 1/2 Cup Kosher Salt
  • 1/4 Cup Sugar
  • 1 1/2 Tbs Black Peppercorns
  • 1 Whole Lemon, Quartered
  • 3-4 Bay Leaves

IMG_1709

Chickens

  • 2 Whole Chickens, 4-5 Lbs Each
  • 4 Tbs Ultimate Roast Chicken Rub or Similar
  • 2 Cans Crispin Hard Cider
  • 1/2 Cup Apple Cider Vinegar
  • 6 Sprigs Fresh Thyme
  • 6 Sprigs Fresh Parsley

FullSizeRender 3

Instructions

  • In a small saucepan over medium heat, combine all of the brine ingredients and stir until completely dissolved.  Remove from heat and set aside.
  • Rinse chickens thoroughly and place in a large pot or jumbo size ziplock bag.  Cover them with ice cubes (about 25-30) and then pour brine over top of chickens.  Add enough tap water to make sure that they are covered completely.
  • Seal and allow to soak in brine in the refrigerator for a minimum of 4 hours and a maximum of 24 hours.  The longer the better, but even 4 hours will do a lot to flavor and tenderize your birds.
  • Remove chickens from brine, rinse thoroughly and pat dry.  Discard brining liquid.
  • Use Ultimate Chicken Rub or your favorite rub mixture to coat birds inside and out.
  • I have “beer butt stands” that I can pour cider, vinegar and herbs into.  If you don’t have these, pour about a quarter of the cider out of each can, add half of cider and herbs to each can.
  • Slide birds over your cider can or stand.  Either tie a piece of cooking string around the wings or create 2 “pockets” in each bird that you can tuck them into.  Place on a charcoal grill – you can cook with or without wood chips for smoke or on a gas grill as well.  Cook offset from heat for 2 1/2 to 3 hours at 275 degrees.  Skin should be nicely browned and juices should run clear.
  • Remove from grill, place on a cookie sheet and cover with foil.  Allow to rest for 15-20 minutes.
  • Carve into pieces or de-bone and serve.

FullSizeRender 4

FullSizeRender 6

This recipe is pretty simple, but you have to know your grill and make sure these birds are cooked through.  Use a meat thermometer and make sure the internal temp gets to 165 degrees.  I take it off the grill between 155 and 160 and let the temp continue to rise while it’s covered with foil off the grill.  There are many variations you can try once you master the process of brining and cooking “beer butt style”.  I like using beer, but the hard cider really imparts apple flavor that you can taste in the chicken.  Try experimenting with different flavors in the brine, the rub or the cooking liquid.  I’d love to hear your ideas!  Also, please click on the links above to find out where you can get the Ultimate Roast Chicken Rub and the Beer Butt Stands.  Happy grilling!!

H-M-G Iced Green Tea

The early heat of this summer calls for cool refreshment!  I love iced tea and have taken a liking to using green tea as a lighter alternative to traditional varieties.  Try this sun-brewed recipe for my Honey, Mint and Ginger tea to add flavor and sweetness for a perfect summer afternoon or a little happy hour cocktail with the addition of vodka and a splash of soda water.

FullSizeRender

HMG Iced Green Tea

Ingredients

  • 2 Quarts Water
  • 4 Green Tea Bags
  • 1/4 Cup Honey
  • 1 “Thumb” Fresh Ginger
  • 3 Large Sprigs Fresh Mint

Instructions

  • Peel a thumb-sized piece of fresh ginger and cut into slices.
  • In a small saucepan, combine two cups water, honey and ginger.  Bring to a boil and then turn down to let simmer for 5 minutes.
  • In a large glass pitcher, combine remaining water, tea bags, mint and honey/ginger liquid.
  • Cover pitcher with plastic wrap and place outside in the sun.  Allow to step for at least 4 hours.
  • Remove tea bags and mint.  You can also remove ginger pieces, but I like to leave them in to continue to flavor the mixture.
  • Serve over ice.

If you’re feeling like a cocktail, add 2 ounces of good vodka to an ice-filled glass, fill 3/4 with tea and then top with soda water.  Garnish with mint sprigs and an orange slice.  Either way you make it, sit back, sip and enjoy!!

Chocolate Chip Zucchini Bread

Looking for a little something sweet and satisfying to go with your morning coffee?  Try this take on a run-of-the-mill zucchini bread recipe.  With sour cream for moistness and semi-sweet chocolate chips this sweet bread is perfect for breakfast, dessert or your upcoming 4th of July picnics!

CHOCOLATE CHIP ZUCCHINI BREAD

Ingredients

  • 4 Eggs
  • 1 1/2 Cups Sugar
  • 2 Tsp Vanilla
  • 3/4 Cup Vegetable Oil
  • 1/2 Cup Sour Cream
  • 2 Cups Grated Zucchini
  • 2 Cups All Purpose Flour
  • 2 Tsp Baking Powder
  • 1 Tsp Baking Soda
  • 2 Tsp Cinnamon
  • 1/2 Tsp Ground Mace
  • 1 Tsp Salt
  • 1 Cup Semi-Sweet Chocolate Chips

Instructions

  • Preheat oven to 350 degrees.
  • In a large bowl, beat eggs until frothy.  Add sugar and beat until sugar is dissolved and mixture is creamy.
  • Add vanilla, oil and sour cream.  Mix thoroughly.
  • Drain grated zucchini in a colander and stir into mixture until evenly distributed.
  • In a separate bowl, sift together flour, baking powder, baking soda, cinnamon, mace and salt.
  • Pour dry ingredients into wet and mix until well combined.  Do not over-mix.
  • Fold in chocolate chips until evenly distributed.
  • Pour mixture into a buttered and floured bundt pan or 2 loaf pans.
  • Bake at 350 degrees for 45-50 minutes or until a toothpick comes out clean.
  • Allow to cool in pan for 10 minutes and then turn out to a wire rack to cool completely.

IMG_1700

This is a very simple recipe that can be made with variations.  Try substituting 1 cup chopped walnuts for the chocolate chips or a half cup drained crushed pineapple and a half cup raisins for the chocolate chips.  I’d love to hear what combinations you come up with and how they turn out.  Dig in and enjoy!!

Milwaukee Public Market

IMG_1655

One of the best ways to get a true feel for the people and the food of any city is to visit the local market.  If they don’t have an historical market, most cities are working hard to establish new ones as a gathering place and showcase of the fine foods they have to offer – Milwaukee Public Market is one of the finest examples I’ve seen.  Located downtown, conveniently near plenty of parking and other shopping, they feature tons of vendors with prepared foods, delicious ingredients for your own cooking, on-site cooking classes and a full calendar of interesting events.  To give you an idea, in the 3 days we were in town, we visited this place 3 times!

IMG_1645

Looking for some great coffee and sweets?  Grab a fantastic pastry or cookie from C. Adams Bakery.  The selections are endless and beautiful!  You’re definitely going to want to accompany your selection(s) with a honey vanilla latte (iced or hot) from Anodyne Coffee.  They roast their own beans and have some really great drink options.  Right across the street, and with 5 more locations throughout the city, is Colectivo Coffee.  They are worth a stop as well with a great selection of house-roasted coffee drinks as well as pastries and sandwiches.

IMG_1673

Looking for some real food?  Check out Aladdin for delicious homemade hummus and other Middle Eastern delights.  The St. Paul Fish Company has lots of selections of fresh fish for you to take home, but there were a ton of people sitting at their counter with smoked salmon on a stick or having fresh oysters shucked right in front of them!  I had the breakfast tacos one day from Margarita Paradise and was blown away with the quality and freshness.  Finally, for a huge selection of meats, homemade sausage, fresh salads and an endless number of sandwiches and panini, check out Nehring’s Family Market.

IMG_1647

My only regret is that we didn’t have more days to explore and try more things at the Market!  I highly recommend checking it out for a quick meal or a day trip before shopping in the Historic Third Ward – you’ll be one very happy foodie if you do…

Distil – Milwaukee

Our recent Milwaukee trip was full of adventures in sightseeing, music and food!  We definitely had a memorable stop at Distil.  A dark, comfortable restaurant with urban-classic decor wasn’t too busy or loud for cocktails and noshes on a Friday night out with friends.  If you’ve read some of my posts, you know I have an affinity for this type of craft American fare and distinctive drinks.  Distil did not disappoint!  The Rosa Umada was a fantastic experience/cocktail.  An old fashioned glass is sprayed with an aerosol of grain alcohol infused with clove and placed over a larger glass with smoking wood chips.  It’s brought to your table, the glass is removed to release the smoke and then a wonderful mix of bourbon, maple and vanilla is poured into it.  It’s a beautiful presentation and a fantastic twist on a classic bourbon cocktail.  I know I absolutely want to try making this at home – you can’t get enough of the smokey aroma!

IMG_1661

They have a great selection of small plates, we sampled the cheese board, charcuterie board and the steak tartare.  I’m sucker for these when they’re done well.  The boards looked gorgeous and were amply covered in a great selection of meats, cheese and accompaniments.  Whether is was the duck prosciutto with grain mustard, blue cheese with honeycomb and Marcona almonds or a cheddar, salami and raspberry stack they were all fresh and tasty!  The tartare had a nice texture, just enough capers and a creamy egg yolk.  The whipped bone marrow gave just enough fat and richness to set this apart from other preparations I’ve had.

IMG_1685

IMG_1688

Overall, this was a really nice spot for small plates and cocktails.  I’d recommend it for a pre-dinner or pre-theater date night or happy hour.  Clinton Sterwald is an imaginative mixologist with a keen sense of aroma, taste and presentation.  The Apartment 137 is another must-try drink on their menu!  Give them a try for the best of Wisconsin’s small bites and cocktails.  You can check out their menu and story at distilmilwaukee.com.  Dig in!

Blueberry Buttermilk Mega Muffins

You’ll feel like you’re having a “vacation brunch” when you bake my favorite blueberry muffins!  Chock-full of sweet blueberries these dense tangy muffins are best when made in huge muffin tins.  This recipe yields just 6 muffins, but it’s tough to eat a whole one yourself.  Make them for your next weekend guests or for a lazy weekend morning on the patio with your iced coffee!

IMG_1629

BLUEBERRY BUTTERMILK MEGA MUFFINS

Ingredients

  • 2 1/2 Cups All Purpose Flour
  • 1 Cup Sugar
  • 1 1/2 Tsp Baking Powder
  • 1/2 Tsp Salt
  • 1 Stick Melted Butter
  • 2 Eggs, Beaten
  • 1 1/4 Cups Buttermilk
  • 1 1/2 Cups Fresh Blueberries
  • 1 1/2 Tbs Large Crystal Sugar

Directions

  • Preheat oven to 400 degrees.
  • Stem and rinse blueberries and dry thoroughly on paper towels.  Set aside.
  • In a large bowl, sift together the first 4 dry ingredients.
  • Add beaten eggs and buttermilk to dry ingredients and mix just enough to combine.
  • Stir in melted butter until mixture is smooth.  It will be a thick batter vs. loose like cake batter.
  • Reserve 20-25 blueberries.  Gently fold remaining blue berries into batter until just evenly combined.
  • Spoon batter into large muffin tins (6 to a tray) that have been sprayed with cooking spray.
  • Use remaining blueberries to top muffins and then sprinkle evenly with crystal sugar.
  • Bake for 25-30 minutes until a toothpick inserted comes out clean.
  • Allow finished muffins to cool in pan for 10 minutes and then remove to a wire rack to cool completely.

FullSizeRender

My mom made these muffins for me years ago and they are some of my favorites!  I’ve tweaked the recipe since to get just the right density and amount of fruit to hold them together.  I love them with blueberries, but they are excellent with mixed berries as well.  Try some variations and let me know what you think!