Sticky Cinnamon Rolls

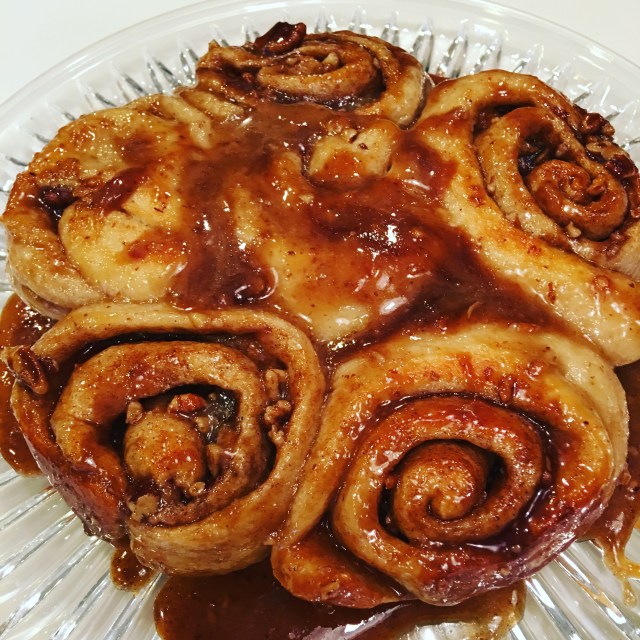
Holidays were made for indulgences.  Let’s face it, I ate a significant portion of the 65 lbs of ham and turkey I made for Thanksgiving a few days ago.  So why not go the extra mile for my family in town this morning by making some homemade cinnamon rolls?!  Calorie counting will commence promptly on Monday, but I will continue to enjoy the rest of this weekend.  You’ll love the recipe below because it’s easy and also offers a twist with the addition of apricot honey butter (from my home town) and chopped pecans.  Go ahead, make some for yourself and make any weekend morning special.

IMG_0334.JPG

STICKY CINNAMON ROLLS

Ingredients

Instructions

  • Preheat oven to 375 degrees.
  • Warm jar of honey butter in microwave for 30 seconds.  Remove and pour contents into bottom of a 9″ round non-stick pan.  For this recipe I used apricot pecan honey butter from a candle and honey company in Medina, OH called A.I. Root.  However, you an also find the same flavor combination here or at your local retailer.
  • Roll out pizza or bread dough to a 12-inch x 12-inch square.
  • In a small bowl, stir together brown sugar, pecans and cinnamon.  Spread in a thin even layer over the pizza dough going completely to the edges.
  • Roll dough from one side tightly until you have a long tube.
  • Cut rolled dough into six pieces and then place sideways into pan of honey butter.  Arrange five on the outside and one in the middle.  Press down slightly so that all edges are touching.
  • Bake at 375 degrees for 12-14 minutes until top is golden brown and middles are no longer gooey.
  • Remove from oven and top with a heat-safe platter.  Turn baking pan upside down to turn out finished rolls.  Scrape any excess honey butter and pecans onto the top of the cinnamon rolls.
  • Allow to cool for 5 minutes and then serve immediately.

This super-sweet decadent treat is perfect for weekend company or for a brunch event.  It would be easy to triple this recipe and make them in a 13×9 pan as well.  You can also substitute any kind of honey butter here, but I’ll tell you that the apricot gives a wonderful fruity hint to any otherwise really sweet dish.  Either way, I think you’ll make these again and again when you feel the need to indulge.  Dig in and enjoy!

Breaded Pork Chops

Sunday supper and football season = breaded pork chops.  My mom has made this recipe for as long as I can remember – I’ve seriously watched her make these 100 times or more!  And I have never once been disappointed in the result.  When you think breaded pork chops, you think of a crispy schnitzel or something similar.  However, the combination of frying and then slow cooking gives you soft savory no-knife-needed pork chops.  This is the ultimate in comfort food and will be part of your regular rotation for the rest fall and winter!

img_0306

BREADED PORK CHOPS

Ingredients

  • 12 Bone-In Center Cut Pork Chops (about 1/2 to 3/4 inch thick)
  • 3 Eggs, Beaten
  • 1 1/2 Cups Seasoned Bread Crumbs
  • 6-8 Tbs. Canola Oil
  • 1/4 Cup Water

Instructions

  • Preheat oven to 325 degrees.
  • Using two paper plates, creating a dredging station with beaten eggs in the first plate and bread crumbs in the second.
  • Heat an electric skillet, or a cast iron skillet on the stove top, to about 350 degrees.  Add half of the canola oil.
  • Dip each pork chop first in egg and then in bread crumbs.  Shake off excess and place in hot oil.  Brown 3-4 chops at a time.  Do not overcrowd pan.
  • Brown in oil for 2 minutes per side and place into a glass 13 x 9 baking dish.  Continue process adding more oil as needed until all chops are done and stacked in baking dish.
  • Pour 1/4 cup water into the baking dish and cover tightly with foil.
  • Bake for 2 hours at 325 degrees.
  • Serve immediately.

The simplicity of the ingredients and the slow cooking really bring out the best flavor of the pork.  The fat will render from the breading and the meat so make sure you remove the finished chops from the cooking liquid to both serve and store leftovers.  You won’t believe how tender these turn out – both for dinner and leftovers the next day!  Comfort food is served – thanks mom!  Dig in!

Thai BBQ Short Ribs

While I’ve never had a chance to travel to Asia, I absolutely love all kinds of food from the region.  This recipe for short ribs draws inspiration from Thai cooking and uses satay sauce as the base for the marinade.  Satay is usually made with coconut milk, peanuts, garlic and spices.  It’s an easy marinade that’ll make you devour these short ribs with all their fatty goodness!  You’ll want to try it on chicken as well – the peanut, coconut and spice all make for a warm nutty bbq treat.

img_0281

THAI BBQ SHORT RIBS

Ingredients

  • 3 Lbs. Sliced Beef Short Ribs
  • 1/2 Cup Prepared Satay BBQ Sauce (available in most grocery stores with Asian foods)
  • 2 Cloves Fresh Garlic, Minced
  • 4 Tbs. Lite Soy Sauce
  • 3 Tbs. Brown Sugar
  • 2 Tbs. Toasted Sesame Oil
  • 1 Tbs. Fresh Lime Juice
  • Pinch Red Pepper Flakes

fullsizerender-3

Instructions

  • In a small bowl, stir together satay bbq sauce and remaining ingredients until smooth and brown sugar dissolves.
  • Brush both sides of each short rib with marinade and stack in a 13×9 baking dish.
  • Pour any remaining marinade over the short ribs.
  • Cover with plastic wrap and marinate in the refrigerator for at least 4 hours.
  • Remove from fridge and allow to come to room temperature, about 30 minutes.
  • Remove each rib from the baking dish and shake off an excess marinade as you place them on a hot grill.  Grill short rib slices over medium heat for 5-7 minutes per side.  Flip them several times to avoid burning the marinade.
  • Serve immediately.

If you’re a fan of Thai food or this is your first foray into the world of satay, I think you’ll be glad you made this recipe!  You can also use the recipe above and substitute an equal amount of peanut butter for the brown sugar and use it as a dipping sauce!  The combination of richness, warmth and a hint of sweetness make this delicious on beef and chicken and any time of the year.  Dig in!

Roasted Chicken, Leeks & Apples

Looking for an alternative to plain baked chicken?  The sweet and savory combination of apples and leeks roasting in the rendered chicken fat are a tasty fall delight.  You’ll love the single-pan simplicity of this dish that’s just good rustic comfort food.  And fall is the perfect time to make it with October and November as the prime season for both apples and leeks.

fullsizerender

ROASTED CHICKEN, LEEKS & APPLES

Ingredients

  • 4 Bone-in Chicken Thighs
  • 3 Large Leeks
  • 3 Medium Apples (Jonamac or another sweet/tart baking variety)
  • 3 Tbs. Olive Oil
  • 8 Sprigs Fresh Thyme
  • 1 1/2 Tsp. Salt
  • 1 Tsp. Black Pepper

fullsizerender-2

Instructions

  • Preheat oven to 400 degrees.
  • Brush a large heavy cookie sheet with 1 Tbs. of olive oil to coat lightly.  Place chicken thighs on sheet, but leave space between them.
  • Wash and dry leeks and apples.  Leeks can get gritty with sand/soil so be sure to wash them thoroughly.
  • Core and slice apples into 6-8 slices each.  Cut the tops off the leeks, cut the bottom in half and then in half lengthwise to get 4 pieces per leek.  Place all leeks and apples on the cookie sheet.  Again, spread out evenly to allow for even roasting and caramelization.
  • Drizzle all ingredients with the remaining 2 Tbs. of olive oil and then salt and pepper.  Top with sprigs of fresh thyme.
  • Bake in the oven for 35-45 minutes until chicken is cooked through.
  • Remove from oven and serve immediately.

As the chicken renders and the skin crisps, the fat will spread through the pan to give everything some delicious “chicken love”.  Mild onion flavor and sweet/tart apples perfumed with thyme are the perfect accompaniment to a perfect chicken thigh.  You can easily double this recipe and use a whole cut up chicken, but you’ll need to use two cookie sheets.  The key is to give everything enough space to roast and caramelize properly.  I have no doubt that this will be a regular in your family’s weekly menu once you try it.  Dig in and enjoy!

Krueger’s Tavern – Cincinnati

The OTR (Over-The-Rhine) area of Cincinnati continues to draw great restaurant and retail development and has firmly secured itself as “the place to see and be seen” downtown.  Last weekend we tried a new (to us) spot in Krueger’s and it will definitely be one to come back to again and again.  Situated right on Vine Street it’s on the south end of the strip.  And like some of it’s sister establishments it has just enough seating and an open garage-door-front that gives you a great place for lunch, dinner and/or drinks while watching the eclectic mix of people stroll by.  However, what Kruger’s has that the others do not is an awesome rooftop deck that’s perfect for afternoon sunshine or evening dining al fresco.

fullsizerender-11

With a fairly nondescript modern american interior, there is seating at the bar, a few tables and then a wall of tables with banquette seating.  It’s warm, comfortable and a little dark – which I like!  There’s a diverse drink menu with craft cocktails and two beers on tap.  That’s right, just two.  You also have your choice of an amazing array of 70 canned beers as well – from local faves to classic PBR tall boys.  We grabbed a few cans and started our lunch with the warm pretzels and beer cheese.  Made with Rhinegeist Cougar and sharp cheddar, it was delicious.  I’m kicking myself that we didn’t add sausage to it!  The cheese is kept warm in a cast-iron skillet over a small flame – bonus points for the fresh presentation and beer cheese that stays steamy to the last bite!

Krueger’s is known for their house-ground burgers and sausages so we naturally had to sample both.  The burgers are fresh with full beefy flavor and perfectly crispy edges.  They’re all doubles and the classic was excellent.  There are A LOT of great burger places in Cincy and this one is right up there with the best.  We also tried the Lincolnshire english sausage with colcannon (a scrumptious mixture of whipped potatoes and wilted kale).  It was perfectly spiced and a really hearty dish.

Overall, we were definitely impressed with the menu and the fact that they do just a few things and do them really well.  The team at TRG, founders of The Eagle and Bakersfield, hit another home run with this one.  You can find out more on their website at kruegerstavern.com.

Breakfast Stromboli

I love breakfast for any meal any day of the week.  Who doesn’t like pancakes for dinner??  Things can get a little boring sometimes so I like to mix it up with this great recipe for my breakfast stromboli.  Gooey cheese, creamy eggs and salty ham all wrapped up in a pizza dough crust is perfect for breakfast on the go or a hearty dinner.

fullsizerender-7

BREAKFAST STROMBOLI

Ingredients

  • 1 Tube Prepared Pizza Dough
  • 4 Eggs
  • 1/2 Cup Diced Cooked Ham
  • 1/4 Cup Red Onion, Diced
  • 3/4 Cup Shredded Sharp Cheddar Cheese
  • 1 Tbs. Butter
  • 1 Tsp. Kosher Salt
  • 1 Tsp. Poppy Seeds

Instructions

  • Preheat oven to 400 degrees.
  • In a frying pan, melt butter over medium heat and add onions.  Cook 3-4 minutes until translucent.
  • Add diced ham and cook an additional 3-4 minutes until onions and ham are browned.
  • Beat eggs in a bowl and then pour over ham and onions.  Cook over medium heat stirring constantly.  When your scramble is cooked and dry, remove from pan to a dish and allow to cool for 10 minutes.
  • Remove pizza dough and spread out to cover a standard cookie sheet.
  • Place scrambled eggs, ham and onions lengthwise down the middle of the dough.  Leave 2 inches at each end to fold over.
  • Sprinkle cheese over mixture and then fold dough together.  Pinch to seal seam.
  • Fold ends of dough over to seal and then turn the entire stromboli over on cookie sheet so the seam side is down.
  • Cut 3-4 slits in the top to vent while cooking.  Brush or spray lightly with oil and then sprinkle with salt and poppy seeds.
  • Bake for 13-17 minutes until golden brown and dough is cooked through.  You need to bake a little longer than you think because the wet mixture inside will keep the dough from cooking quickly.
  • Remove from oven and allow to cool for 5 minutes before serving.

img_0237

This recipe can be made as a whole stromboli or could be made into smaller individual servings for eating on the go.  Once you get the process down, you can change up the flavors to your liking.  Try using spicy sausage and cream cheese instead of ham and cheddar.  Shredded chicken and diced tomatoes, spinach and swiss cheese are a great combination as well.  I’m sure you’ll love it and so will your family.  Dig in!!

Hot Mulled Apple Cider

When the weather turns to fall, there’s a certain chill in the air even on the warm days.  It’s for cool nights like these and throughout the holidays that hot mulled apple cider was intended.  This is an easy recipe to make for an evening gathering, a tailgate or to keep on hand in the fridge for single servings. You can buy “mulling spice packets” in many stores, but this is easier and less expensive as a DIY!

img_0242

HOT MULLED APPLE CIDER

Ingredients

  • 1 Gallon Apple Cider (Filtered or Unfiltered)
  • 3/4 Cup Light Brown Sugar
  • 3 Cinnamon Sticks
  • 1 Tbs. Whole Cloves
  • 1 Tbs. Whole Allspice
  • 1 Tsp. Ground Mace

Instructions

  • Pour cider into a large pot and warm over medium heat.
  • Add brown sugar to warmed cider and stir to dissolve.
  • Add the spices and allow to steep in cider over medium-low heat for 90 minutes.  Stir occasionally and do not allow to boil.
  • Strain and serve immediately.  You can also allow to cool, strain and then store in the refrigerator for up to a week or the expiration on your cider.

This cider will warm you up snuggled on the couch, by the campfire or to start your day.  Any way you choose, you’ll love this sweet/tart/spiced treat!  I guarantee you’ll make this once and then keep some on hand throughout the fall and winter.  So, make a batch and enjoy with a few homemade snickerdoodles.  Want to make it a party drink?  Try adding a shot of spiced rum or cinnamon whisky to a warm mug – cheers!  Dig in!

Roasted Pumpkin Seeds

Preparing for Halloween festivities this weekend most-likely includes carving a few pumpkins.  I’m always nostalgic when doing so – scooping out the orange “guts” and then roasting pumpkin seeds.  Who doesn’t love warm crunchy-salty seeds right from the oven??  Try this recipe today or tomorrow when you’re making your scary creations.

fullsizerender

ROASTED PUMPKIN SEEDS

Ingredients

  • 2 Cups Fresh Pumpkin Seeds
  • 2 Tbs. Extra Virgin Olive Oil
  • 2 Tsp. Sea Salt
  • 1 1/2 Tsp. Garlic Powder
  • 1 1/2 Tsp. Chili Powder
  • 1 Tsp. Onion Powder

fullsizerender-3

Instructions

  • Preheat oven to 400 degrees.
  • Thoroughly wash and dry pumpkin seeds.
  • Place seeds on a foil-lined cookie sheet and bake for 8 minutes.  They should be dry and slightly toasted.
  • Remove from oven and drizzle with olive oil.  Sprinkle dry ingredients over seeds and toss on cookie sheet to evenly coat them.
  • Place back in oven and bake an additional 5-10 minutes until browned and crispy.
  • Remove from oven and cool.  They will store in an air-tight container for up to two weeks.

Enjoy your pumpkin seeds as a snack or as a great addition to salads.  Simple, delicious and a reminder of the last day of October and the beginning of the upcoming holiday season.  Dig in and be safe trick-or-treating!!

Layered Taco Dip

Who doesn’t love the crunchy-cool combo of taco dip while watching a big game?  I’ve made and eaten a lot of versions in the past, but I do love this cold combination versus a baked one.  It’s perfect for transporting or tailgating as well since you don’t have to worry about keeping it warm.

img_0221

LAYERED TACO DIP

Ingredients

  • 1 16-Ounce Can Refried Beans
  • 2 Tbs. Water
  • 16 Ounces Sour Cream
  • 1 Envelope Taco Seasoning
  • 3 Green Onions, Chopped
  • 1 1/2 Cups Shredded Sharp Cheddar Cheese
  • 1 1/2 Cups Shredded Lettuce
  • 3 Small Tomatoes, Seeded and Diced
  • 1 Bag Tortilla Chips or Fritos

Instructions

  • In a 13 x 9 baking dish, place refried beans, water and half of the taco seasoning.  Mix well and then spread into an even layer in pan.  The water helps to loosen the beans and make them more “dippable”.
  • Put the remaining taco seasoning into sour cream container and mix well.  Spread in an even layer on top of beans.
  • Sprinkle green onions on sour cream mixture.  Top with lettuce and then finally with diced tomato.
  • Cover and chill in the refrigerator for at least 1 hour prior to serving.
  • Serve with chips for dipping.

This is a popular dish every time we take it somewhere!  I do love using Fritos Scoops with it, but good sturdy restaurant-style tortilla chips are great too.  Once you taste it, you’ll know that anything you put in it is a winner!  Try it for your next tailgate or at your Halloween party this weekend.  Dig in and enjoy!

Classic Spaghetti Sauce & Meatballs

When I tell people I love to cook and write a blog they always ask, “so what’s your signature dish?”  I hate to say just one thing because I really love to cook all kinds of food.  However, my Sunday red sauce and meatballs is one of my most favorite things to make.  Who doesn’t love when the house is filled with a aroma of all-day sauce simmering on the stove??  While it requires some work, I assure you that the effort will be rewarded with a happy belly and plenty of compliments!

img_0198

MEATBALLS

Ingredients

  • 1 Lb. Ground Beef (85/15)
  • 1 Lb. Ground Veal
  • 1 Lb. Ground Pork
  • 3 Slices White or Italian Bread, Torn Into Pieces
  • 1 Small-to-Medium Yellow Onion, Finely Diced
  • 2-3 Cloves Fresh Garlic, Minced
  • 2 Eggs, Beaten
  • 2 Tbs. Dried Parsley
  • 1 Tsp. Salt
  • 1 Tsp. Black Pepper

img_0193

Instructions

  • Preheat oven to 350 degrees.
  • If you don’t like using veal, you can substitute beef.  Your mixture will then be two thirds beef and one third pork.
  • Place all ingredients in a large bowl.  Combine thoroughly with your hands, but do not over-mix.
  • Roll mixture into golf-ball sized meatballs.  Do not compact these hard, but just enough to hold their shape.  Place onto a foil-lined cookie sheet.  This mixture should make roughly two dozen meatballs.
  • Bake in oven for 30 minutes.  Start your red sauce while these are baking.

CLASSIC SPAGHETTI SAUCE

Ingredients

  • 2 28-Ounce Cans Tomato Sauce
  • 1 28-Ounce Can Water
  • 1 14.5-Ounce Can Diced Tomatoes
  • 1 6-Ounce Can Tomato Paste
  • 1 Medium Yellow Onion, Diced
  • 4-5 Cloves Fresh Garlic, Minced
  • 3 Tbs. Extra Virgin Olive Oil
  • 3 Tbs. Dried Parsley
  • 1 1/2 Tbs. Dried Oregano
  • 1 1/2 Tbs Dried Basil
  • 1 Tsp. Red Pepper Flakes
  • 1 1/2 Tsp. Salt
  • 1 Tsp. Black Pepper

img_0194

Instructions

  • In a large heavy pot over medium heat, I use a porcelain-coated cast iron one, sauté diced onions in olive oil until translucent.  Add garlic and sauce for another 2-3 minutes.
  • Add to pot both cans of tomato sauce, diced tomatoes and tomato paste.  Use one of the large cans to measure and add one full can of water.  Stir everything until combined and tomato paste is distributed.
  • Add remaining ingredients to the pot and stir until evenly distributed.
  • Bring sauce to a simmer and then lower heat.
  • ADD YOUR BAKED MEATBALLS.
  • Simmer sauce and meatballs over low heat for 5-6 hours, stirring every 30 minutes to prevent sticking.
  • Sauce will reduce and turn a deep-red color.
  • Serve over your favorite pasta and top with grated pecorino or parmesan.

img_0196

Seriously, why would you ever buy spaghetti sauce in a jar when you can make your own that’s ten times better?!  So here it is, my “signature dish” for the world to make for themselves – the secret it out!!  Dig in and enjoy, I hope you love it as much as we do!