Hawaiian Kabobs

It’s officially grilling season!  Although I grill year-round, some of my neighbors are just getting started for the year.  Beyond the typical burgers, dogs, chicken and steaks I love to mix it up and try new things.  Using kielbasa or smoked sausage, these Hawaiian kabobs get a sweet and salty kick from chunked pineapple and a teriyaki glaze.  Whisk away to the islands and try this recipe for your next grilled dinner.
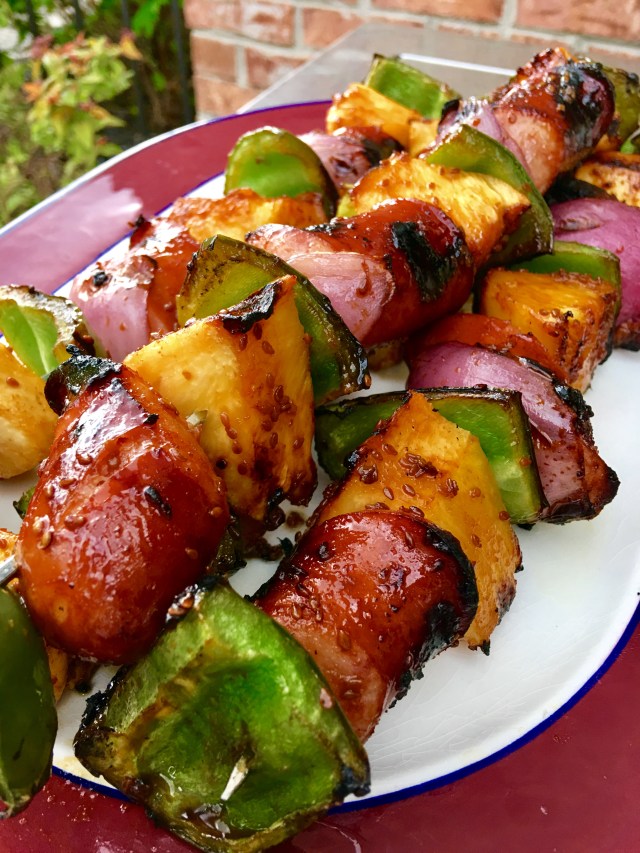
FullSizeRender 3

HAWAIIAN KABOBS

Ingredients

  • 1 Lb. Kielbasa or Smoked Sausage
  • 1 Green Pepper
  • 1/2 Red Onion
  • 12 2-Inch-Square Pineapple Chunks
  • 1 Cup Teriyaki Sauce

Instructions

  • Cut kielbasa, on a bias, into 12 even pieces.
  • Core and seed green pepper, cut into 2-inch pieces.
  • Cut 1/2 red onion into quarters and separate layers of onions.
  • Arrange ingredients on metal kabob skewers by alternating sausage, pineapple, pepper and onion.  You should be able to fill 4 12-inch skewers with the ingredients above.
  • Grill kabobs over medium-low heat for 25 minutes.  Turn every 5 minutes to cook evenly, brushing with teriyaki sauce each time.  NOTE:  I love using Trader Joe’s brand Island Soyaki as it has a great blend of teriyaki, soy, pineapple and sesame seeds.
  • Remove from grill and serve immediately over white or brown rice.

A few ingredients, simple preparation and delicious results make this one a keeper.  I know we’ll be making these throughout the summer and especially when we’re camping.  They’re just as easy on a roasting stick over a fire as they are on the grill!  Give them a try and let me know what you think.  Dig in!

The Best Egg Salad

There’s a kosher deli in Cincinnati that makes egg and tuna salad to die for.  And when I can’t get to Marx Bagels in Blue Ash, I gotta get my fix making the best I can at home.  Given the Easter holiday and a surplus of hard boiled eggs I had to perfect my own version at home.  Now, I’ll never replace the witty banter sitting at Marx’s counter, but I can definitely get on board with this egg salad recipe!

IMG_0787.JPG

THE BEST EGG SALAD

Ingredients

  • 1 Dozen Hard-Boiled Eggs
  • 3/4 Cup Mayonnaise
  • 2 Tbs. Dijon Mustard
  • 2 Tbs. Grated Carrot
  • 1 Tsp. Salt
  • 1/2 Tsp. Black Pepper
  • 1/2 Tsp. Celery Seed

Instructions

  • Peel and rinse eggs and set on a towel to dry.
  • Coarsely chop eggs and place in a medium bowl.
  • Add carrot, mayonnaise and dijon mustard and stir together until well combined.
  • Season with salt, pepper and celery seed.  Stir until incorporated.
  • Serve immediately or store in an air-tight container refrigerated for up to 3 days.

If you like your egg salad a little wetter or drier, just adjust the mayonnaise to your taste. It’s tough to not love the simplicity of this recipe on its own or made into an amazing sandwich on toasted rye or a chewy bagel.  Make some for lunches this week or for your next picnic outing.  Dig in!

Italian Beef

My mom has this great recipe for Italian beef that we’ve enjoyed for years.  As with all recipes though, I wondered “what would make this better?”  Now, improving on mom’s cooking is a delicate matter (go ahead, ask her!) so I wholly admit that her version is rock-star.  What I love about this recipe is that you can make it ahead and easily put it in the oven for a family gathering without having to go through a lot of fuss.

FullSizeRender 2

ITALIAN BEEF

Ingredients

  • 3-4 Lbs. Top Sirloin Roast
  • 8 Whole Garlic Gloves, Peeled
  • 1 1/2 Tbs. Olive Oil
  • 2 Tbs. Dried Italian Herbs

For The Au Jus

  • 1 Envelope Dry Italian Dressing Mix
  • 1 Envelope Brown Gravy Mix
  • 1 1/2 Tsp. Worcestershire Sauce
  • 1 Tsp. Red Pepper Flakes
  • 1/2 Tsp. Black Pepper
  • 1 1/2 Cups Warm Water

Instructions

  • Preheat oven to 375 degrees.
  • Tie roast with 4-5 rings of cooking twine to hold together.  Place in a shallow roasting pan.
  • Make eight slits in the top of the roast and put a clove of garlic in each slit.
  • Rub roast with olive oil and then sprinkle with Italian herbs.
  • Place in oven and roast for 1 1/2 – 2 hours or until the internal temperature reaches 120 degrees.
  • Remove from oven, tent with foil and allow to cool completely.
  • Place roast in refrigerator for 24 hours.
  • Using a very sharp knife or meat slicer, cut cold roast beef into 1/4-inch slices.  Garlic pieces will fall out as you slice it – keep them!
  • Place sliced beef and garlic in an oven-safe baking dish.  Shallow is better.
  • In a medium bowl, combine au jus ingredients and whisk until thoroughly combined.
  • Pour over sliced beef.  Cover with foil and bake in a 325 degree oven for 1 hour until beef is warmed through.  You can also put this back in the fridge and store for up to two days before baking and serving.
  • Serve immediately after baking.

IMG_0781

We typically enjoy this rich bold beef on ciabatta rolls with a slice of provolone cheese and a little horseradish and wow, are they good!  You’re going to want to pour some of that wonderful au jus on that roll to soak in and give you an exceptional bite every time!  Try dressing it up in a sandwich with giardiniera or sautéed mushrooms and onions – the possibilities are endless.  It’s an awesome main dish for a buffet too, everyone loved it on Easter Sunday.  Give this one a try and let me know what variations you come up with, I’d love to hear your ideas.  Dig in!

Loaded Ranch Roasted Potatoes

Want to serve loaded baked potatoes to a crowd without everyone having to top their own spud?  This tasty recipe requires just a little prep and feeds a lot of people.  Delicious loaded crispy potatoes with a hint of ranch flavor will be sure to satisfy your family and friends at your next gathering.  They’re equally perfect with steaks on the grill or as appetizers for a party or the big game.

FullSizeRender 5

LOADED RANCH ROASTED POTATOES

Ingredients

  • 6-8 Medium Russet Potatoes (depending on size)
  • 2 Tbs. Canola Oil
  • 1 Envelope Ranch Dressing Mix
  • 2 Cups Shredded Cheddar Cheese
  • 3/4 Cup Bacon Bits
  • 4 Green Onions, Chopped
  • Sour Cream (for topping)

Instructions

  • Preheat oven to 375 degrees.
  • Scrub potatoes thoroughly under cold water and set aside to dry.  Cut into 2-inch cubes, leaving skin on.
  • Place cut potatoes in a large bowl and drizzle with canola oil.  Toss to coat.
  • Sprinkle ranch dressing mix over potatoes and toss again to evenly coat.
  • Spread potatoes in a single layer on a foil-lined baking sheet that has been sprayed with cooking spray.  The spray will prevent sticking due to the ranch mix – DON’T SKIP THIS STEP!
  • Bake at 375 degrees for 40 minutes or until potatoes are fork tender and lightly browned.  Remove from oven.
  • Sprinkle baked potatoes with cheddar cheese and bacon bits.  Return to oven for 5-10 minutes until cheese is fully melted.
  • Remove from oven and top with chopped green onion.
  • Serve immediately.

Every time we make these they are a huge hit!  Serve with sour cream for topping.  Want to mix it up a little bit?  Try substituting 3 Tbs. of taco seasoning for the ranch and use a combination of cheddar and pepper jack cheese.  Serve with jalapeños and hot sauce – instant fiesta!  I’d love to hear what combinations you come up with.  Try them for your next Sunday supper or for a Masters watch party this weekend.  Dig in!

Cold Smoked Salmon or Steelhead Trout

If I’m near a bagel shop, I’m hard-pressed to not snag a smoked salmon bagel.  There’s something about the melty salty salmon combined with onions, whipped cream cheese and capers that gets me every time!  Naturally, I said to myself recently, “I can do this at home”.  Sure enough, I figured out a great process to make my own smoked fish that’s fresher and tastier than anything I’ve had before.  This recent recipe was made with a steelhead trout fillet, but can be replicated with salmon as well.

FullSizeRender

COLD SMOKED SALMON OR STEELHEAD TROUT

Ingredients

  • 2-3 Lbs. Salmon or Steelhead Fillet
  • 1 1/2 Cups Kosher Salt
  • 1/2 Cup Light Brown Sugar
  • 1 Tsp. Black Pepper

Instructions

  • Inspect your fish for any pin bones and remove.  Rinse fillet and dry completely with paper towels.
  • In a small bowl, combine salt, sugar and pepper.  Mix thoroughly.
  • Spread 1/3 of salt mixture in a glass baking dish to completely cover the bottom.
  • Place fish on the salt mixture, skin-side down.  Cover the fish with the remaining salt mixture and pat lightly to make sure it adheres.
  • Cover dish with plastic wrap and refrigerate for 24-48 hours.
  • After curing, remove fish from fridge, take out of glass dish and rinse under cold water to remove salt mixture.
  • Dry completely and place on paper towel on a cookie sheet.  Put in fridge and allow to dry for 3-4 hours uncovered.  Flesh will be firm and slightly tacky.
  • Cold smoke fish with alder or another mild wood at 120 degrees for 90 minutes.  I smoke mine over a foil pan filled with ice to prevent the fish from cooking.  The goal is to impart the smoke flavor only.
  • Remove from smoker and refrigerate.  Slice thinly and serve.  It will remain fresh in a ziplock bag for 7-10 days.

I love when a recipe relies on just a few ingredients, but tastes like a million bucks.  The technique here isn’t difficult, but the result is delicious and better than most store-bought versions.  Imagine the oohs and ahhs when you serve your homemade smoked salmon for your next brunch!  Take the time and give it a try, I think you’ll love the process and I know you’ll love the end product.  Dig in!

Hoisin Glazed Pork Belly

My wife came home with a huge slab of pork belly the other day and I decided to split it in half and start experimenting.  The result of one half was this ridiculously delectable Asian-inspired pork belly.  Packed with flavor, melt-in-your-mouth soft and perfectly crispy on the outside, it made for great sliders.  While it’s a little out of your comfort zone, it’s actually really easy to make and execute well.

HOISIN GLAZED PORK BELLY

Ingredients

  • 3-4 Lbs. Pork Belly (No skin)
  • 1/4 Light Soy Sauce
  • 1/4 Cup Hoisin Sauce (Plus additional for glazing)
  • 1/4 Cup Rice Wine Vinegar
  • 2-3 Cloves Garlic, Chopped
  • 1 Tsp. Fresh Grated Ginger
  • 1 1/2 Tsp. Five Spice Powder
  • 1 Tsp. Sesame Oil

Instructions

  • Place pork belly in a zippered plastic bag.  Set aside.
  • Combine all ingredients in a small bowl.  Whisk well and pour over pork belly.
  • Seal plastic bag, removing as much air as possible.  Place in a glass dish and refrigerate for 24-48 hours.
  • When you’re ready to braise, remove from refrigerator and preheat oven to 400 degrees.
  • Remove meat from plastic bag and place into a glass baking dish.  Pour marinade over meat and add enough water to bring liquid up halfway on pork belly.
  • Cover with foil and bake for 1 hour at 400 degrees.
  • Lower oven temp to 200 degrees and continue to bake for 3 additional hours.
  • Remove from oven.  Use a spatula to remove pork belly from cooking liquid and place on a platter.  Allow to cool for 1 hour.
  • Cover platter with plastic wrap and place cooked pork belly in refrigerator for at least 2 hours.
  • When ready to grill, remove from fridge and slice with a sharp knife into 1/2 to 3/4-inch slices.
  • Grill over medium-low heat to crisp pork belly brushing each side lightly with additional hoisin sauce.  Grilling should take roughly 15 minutes.  Be careful not to burn!

You can serve this fantastic meat on its own as a main dish, in an Asian-style taco or in sliders.  We devoured sliders made with Hawaiian rolls, the pork belly and topped with spicy kimchi – wow!  I know you’ll love trying this out and I’m sure you’ll look like a professional chef when you serve it to your family and friends.  Get this belly in your belly.  Dig in!

Arugula Salad

Sometimes simple is best.  I love all kinds of salads, but this is an easy no-fail salad that is perfect with any meal, to dress up a sandwich or top a pizza.  Just a coupe of ingredients highlight these peppery greens with almost no work at all.

FullSizeRender 26

ARUGULA SALAD

Ingredients

  • 6 Cups Arugula
  • 3 Tbs. Extra Virgin Olive Oil
  • 2 Tbs. Fresh Lemon Juice
  • 1 1/2 Tsp. Sea Salt
  • 1/2 Tsp. Black Pepper
  • Freshly Grated Parmesan Cheese

Instructions

  • Place arugula in a large bowl.
  • Drizzle olive oil and lemon juice over the greens.  Add salt and pepper.
  • Toss lightly to coat evenly.
  • Refrigerate up to 1 hour or serve immediately with freshly grated parmesan.

Voila!  The “little black dress” of salads is now your go-to for almost any occasion.  It’s perfect served to start a meal, as a brunch side with an omelet or quiche or just on its own with a perfectly grilled piece of fish.  Simple ingredients, easy to make and oh-so-delicious.  Dig in!

Rustic Roasted Mushrooms w/Tomatoes

When I’m cutting back on the carbs for a meal, I like to use hearty vegetables to take the place of the potatoes and pasta I love so much.  So forgoing the baked potato with our ribeye steaks tonight I opted for this Italian-inspired baked mushroom and tomato dish.  A friend of mine, Todd – a fellow food connoisseur, made a similar dish almost 7 or 8 years ago for a dinner party and I haven’t forgotten about it.  I know you’ll love the combination of sweet tomatoes, nutty mushrooms and salty parmesan breadcrumbs.

FullSizeRender 25.jpg

RUSTIC ROASTED MUSHROOMS W/TOMATOES

Ingredients

  • 2 Quarts Button Mushrooms
  • 12 Small Campari Tomatoes or 15-18 Large Cherry Tomatoes
  • 6 Tbs. Olive Oil, Divided
  • 2 Cloves Garlic, Minced
  • 1 Tbs. Italian Herb Seasoning (dry works well here)
  • 1 1/2 Tsp. Salt
  • 1 Tsp. Black Pepper
  • 1/2 Cup Dry Breadcrumbs
  • 1/2 Cup Grated Parmesan

FullSizeRender 24

Instructions

  • Preheat oven to 400 degrees.
  • Wash trim and quarter mushrooms.  Place into a large bowl.
  • Wash and dry tomatoes.  Slice each one in half and squeeze gently to remove the seeds.  Add to mushrooms.
  • Pour 4 Tbs. olive oil over vegetables.  Add minced garlic, italian herbs, salt and pepper.
  • Toss gently to evenly coat vegetables and place into a 2-quart baking dish with high sides.
  • Bake in the oven for 20 minutes at 400 degrees.
  • Combine breadcrumbs, parmesan and remaining 2 Tbs. olive oil in a small bowl.
  • Sprinkle this mixture over mushrooms and tomatoes and bake for an additional 10 minutes or until topping is browns and veggies are bubbling.
  • Remove from oven and serve immediately.

There’s a lot of liquid rendered from this dish so it’s best served with a slotted spoon.  If you want to take advantage of all that liquid, you can also toss in 1 1/2 cups stale bread cubes before baking.  Think of all that Italian-herbed earthiness soaked up in tender bread!  Of course that defeats the purpose of going no-carbs.  Either way, you’ll forget all about the missing potato and savor the flavor of this rustic side dish.  I can’t wait to put a few over-easy eggs on the leftovers tomorrow.  Dig in!

Southwest Blackened Chicken Rice Bake

Do you ever have a taste for something, but not quite sure what?  Working from home today I really wanted to put something on the smoker, especially in 60-degree weather.  I was craving spicy Tex-Mex flavors though too and wanted to come up with something that would combine the two while using ingredients we already had in the house.  The result was a cheesy spicy rice casserole with smoked chicken.  While you don’t have to fire up the smoker to make this dish, the flavor was outstanding!

FullSizeRender 21.jpg

SOUTHWEST BLACKENED CHICKEN RICE BAKE

Ingredients

  • 2 Bone-In Chicken Breasts
  • 3 Tbs. Blackening Seasoning – I love Hog’s Breath
  • 1 1/2 Cups Uncooked White Short Grain Rice
  • 1 1/2 Cups Black Bean Salsa
  • 1 Cup Medium Salsa
  • 1 1/2 Cups Water
  • 1 Cup Corn Kernels (frozen or fresh)
  • 1 Tsp. Salt
  • 1/2 Tsp. Black Pepper
  • 2 Cups Shredded Sharp Cheddar Cheese
  • 6-8 Green Onions, Chopped
  • Sour Cream & Hot Sauce For Garnish

Instructions

  • Wash and dry chicken breasts.  Rub in blackening seasoning on all sides.
  • Smoke offset from heat over mesquite or your favorite wood for 1 1/2 hours at 300 degrees until internal temp is 180 degrees.  You can also bake them in the oven at 350 degrees for 45 minutes or they reach the same internal temperature of 180 degrees.  Set aside to cool for 15 minutes.
  • Preheat oven to 375 degrees.
  • In a 2-quart baking dish place rice, both salsas, water, corn, salt and pepper.
  • Remove skin and take chicken off bone.  Shred into bite-size pieces and add all meat to the casserole dish.  Mix all ingredients with a spoon until well combined.
  • Cover dish with foil and bake at 375 for 1 hour.
  • Remove from oven.  Check rice to make sure it’s tender.  If not, you can add a bit more water or chicken stock, stir, cover and bake an additional 10 minutes.
  • Spread shredded cheese over top of the casserole and place under a broiler until cheese is melted and slightly browned.
  • Remove from oven and serve immediately.  Top each plate with chopped green onion,  sour cream and hot sauce to taste.

When I first baked this, I didn’t allow for enough liquid and had to add more to finish the rice cooking.  However, the recipe above should yield a perfect result!  I know you and your family will love this stick-to-your-ribs dish that gives just the right amount of bite set off by the bright flavors of green onion and sour cream.  And if you like to smoke, I would highly recommend the smoked chicken over the baked, it was awesome.  Dig in!

La Piazza Cafe – Palm Coast, FL

On our first visit to Palm Coast, we had some great and not-so-great meals in the area.  La Piazza Cafe in European Village was the former and a rare treat of authentic Italian in a sea of chains in this resort area!  A quaint, kind of kitschy, restaurant with an old-world feel, La Piazza is a labor of love for the Lass Family.  Dine inside or alfresco under the ample covered patio and warm breeze.  You’ll love the atmosphere and the freedom to dress up or dress down for a relaxed dinner.

FullSizeRender 17.jpg

We were seated inside and made some selections from the ample wine list to start the night.  Given a long list of beautiful antipasti choices, we decided on the Antipasto Italiano.  This was a beautiful assortment of meats, cheeses, olives and dressed vegetables served  crostini.  Enough as a starter for four people or a meal for two, the selections were fresh and flavorful.  It’s worth noting here that our server was really friendly and attentive.  She took the time to explain specials, let us drink and chat at our own pace and kept the glasses full throughout dinner.  It really made for a pleasant experience and fun evening!

FullSizeRender 18.jpg

We enjoyed traditional caesar salads, perfect with optional anchovies, and then made our selections from the entrees.  There’s quite a list of pastas, traditional fare, steaks and fish, but it doesn’t feel crowded or fussy.  Our table devoured the traditional Bolognese and Carbonara – some of the best we’ve had.  I ordered the Fra Diavolo which was overflowing with fresh shrimp and calamari.  You can order the spice level from 1-10 and my 4 was plenty to give it a good zip.  The portions are huge though and a single pasta dish is nearly impossible to finish all on your own!

IMG_0635.JPG

Overall, it was a wonderful meal and a great evening with my family.  I definitely recommend making a stop or going out of your way to make a drive to enjoy a meal with the Lass Family.  I hope you enjoy it as much as we did!  You can find out more and take a look at their menu at lapiazzacafe.com.  Dig in!