Peach Blueberry Skillet Crisp

There’s something to be said about using the freshest in-season ingredients when you’re cooking – what good chef or home cook doesn’t?  We’re lucky enough to have a fantastic farm share that we subscribe to weekly and get deliveries of the best produce in the area.  Last week we managed both blueberries and peaches and I just had to mix up this quick delicious dessert.

IMG_2052

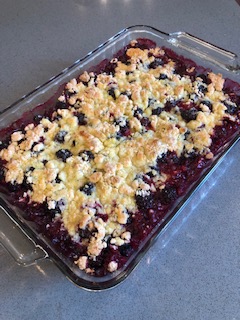
PEACH BLUEBERRY SKILLET CRISP

Ingredients

Filling:

  • 5-6 Medium Peaches
  • 1 Cup Fresh Blueberries
  • 1/4 Cup Flour
  • 1/3 Cup Sugar (a little less if your fruit is ripe and sweet)
  • 1/2 Tsp Vanilla Extract
  • Dash Salt

Topping:

  • 1 Stick (1/2 Cup) Cold Butter
  • 1/2 Cup Flour
  • 1/2 Packed Brown Sugar
  • 3/4 Cup Rolled Oats
  • 1 Tsp. Cinnamon

Instructions

  • Preheat oven to 350 degrees.
  • Peel & slice peaches and place in a medium bowl.  Wash blueberries, pat dry and add to peaches.
  • Add remaining filling ingredients, mix lightly and set aside.
  • In a large bowl mix together flour, brown sugar, cinnamon and oats.
  • Cut butter into small pieces and put in the topping mixture bowl.  Using a pastry blender or fork, mix together topping until mixture is crumbly and butter is in pea-size chunks.
  • Lightly grease a 9-inch cast iron skillet or 9×9 baking dish with butter.
  • Pour in filling and spread evenly – does not need to be perfectly level!
  • Spoon the topping mixture over your fruit and cover completely.  DO NOT press down, the topping will brown and crisp better without it being perfectly flat.
  • Place pan in oven and bake at 350 degrees for 40-45 minutes until top is lightly browned and fruit is bubbling on edges.
  • Serve warm from the oven or at room temperature with vanilla ice cream or fresh whipped cream.

E680655D-0B48-4484-8821-23A8A3C50B2D

There you are, an easy one that you can substitute with almost any fruit!  If you think this one looks good, try it with apples or cherries.  Dig in!

Advertisement

Blackberry Cobbler

We’ve really been focused on eating more local seasonal ingredients this year and have really loved it.  The farm share we subscribe to has been amazing and we’ve tried to come up with recipes to take use such abundance!  This past weekend we visited a local berry farm and found the biggest sweetest blackberries around.  Of course, they were begging to be a dessert and we had a family fish fry/pool party Sunday that offered the perfect occasion.

IMG_1087

BLACKBERRY COBBLER

Ingredients

  • 8 Cups Fresh Blackberries
  • 2 Tbs. Lemon Juice
  • 3 Tbs. Sugar

For the topping:

  • 1 1/2 Cups All-Purpose Flour
  • 1 1/2 Cups Sugar
  • 1/2 Tsp. Salt
  • 2 Eggs, Beaten
  • 9 Tbs. Butter, Melted

IMG_1085

Instructions

  • Preheat oven to 350 degrees.
  • Wash blackberries and pat dry with a towel.  Place blackberries in a 13×9 baking dish sprayed with non-stick spray.
  • Pour lemon juice over berries and then sprinkle with 3 tablespoons sugar.  You can use more or less to taste based on the sweetness of your berries.
  • In a medium bowl, mix together dry ingredients.  Stir in the eggs until combined – the mixture should be crumbly.
  • Spoon mixture over the blackberries.  Do not press down or even out the crumbles – this is what makes the fantastic crispy bits of crust!
  • Drizzle the melted butter over the crumbled mixture and place in the oven.
  • Bake at 350 degrees for 35-40 minutes until the berries are bubbly and the topping is golden brown.
  • Serve immediately or at room temperature with vanilla ice cream.

This recipe is fairly straightforward and can easily substitute any fresh berry or combination.  I like the proportions of this recipe because it lets the fruit be the star of the show and doesn’t completely cover it with crust – save that for pies!  I’ll tell you this didn’t last long at our picnic, but if there’s leftovers keep the pan just loosely covered or the topping will get mushy.  Now get our there and pick some for yourself.  Dig in!

Cherry Date Dainties

I love making old family recipes, especially around the holidays.  This cookie/candy treat comes from my wife’s side of the family and has quickly become one of my favorites this time of year.  Dainties have everything you want in a Christmas treat – sweet, chewy crunchy and festive-looking!  The combination of cherries, dates and nuts isn’t unique, but the crunch given by the addition of crispy rice cereal is.  And who can resist the snowy indulgence of coconut??

IMG_1567.jpg

CHERRY DATE DAINTIES

Ingredients

  • 1 1/2 Cups Chopped Dates
  • 1 Cup Sugar
  • 2 Eggs
  • 2 Cups Crispy Rice Cereal
  • 3/4 Cup Maraschino Cherries, Chopped
  • 1/2 Cup Chopped Walnuts
  • 1 Tsp. Vanilla
  • Dash Salt
  • 1 Cup Sweetened Shredded Coconut

Instructions

  • In a large saucepan, combine dates, sugar and eggs.  Bring to a boil over medium heat, stirring constantly.
  • Cook/boil for 10 minutes until dates break down and mixture becomes almost smooth.  Continue to stir constantly or the mixture will stick and burn.
  • Remove from heat and stir in salt and vanilla.
  • Add cereal, cherries and walnuts.  Stir until mixture is evenly coated.
  • Turn mixture out onto a plate or pan and allow to cool until you can handle.
  • Roll mixture into 1-inch balls and then roll into coconut to lightly coat.
  • Cookies will keep up to 2 weeks.

IMG_1565

This is an easy recipe, but a little tough to execute.  The mixture is VERY sticky and makes it hard to handle.  I like to take a small spoonful of the dough and place it on the coconut and then use the coconut as a barrier to press and roll the cookies.  It doesn’t have to be exactly round as the cherries and flaked coating make them look wintry and festive.  Give them a try and keep this one in your go-to cookie recipes for the holidays.  Dig in!

Fudgey Sandwich Cookies

The last hurrah of summer picnics was yesterday at my in-law’s house.  And while it’s sad to have one last pool weekend of the year, we had a perfect day for family, fun and feasting!  Nothing says party and picnic like these devil’s food sandwich cookies.  Milk’s bff, they’re rich, decadent and unbelievably easy to make.

FullSizeRender 14

FUDGEY SANDWICH COOKIES

Ingredients

  • 1 Box Devil’s Food Cake Mix
  • 2 Eggs
  • 2/3 Cups Shortening
  • 1 Can Chocolate Fudge Frosting

Instructions

  • Cream shortening and eggs with an electric mixer until combined.
  • Add half the package of cake mix and beat until fluffy.
    • Note:  I’ve tried several mixes to get the best result and Kroger brand devil’s food cake mix is by far the best.  However, any brand will give you a good results as long as it’s devil’s food.
  • Add the remaining cake mix and beat just until combined.
  • Using a cookie scoop, drop 1″ balls onto a parchment-lined cookie sheet.
  • Bake at 375 degrees for 9-12 minutes.  BE CAREFUL!  These cookies can burn really easily so watch them closely.
  • Remove from oven and let cool completely on wire racks.
  • Spread bottom of one cookie with 1/2″ of fudge frosting and top with another cookie.
  • Store in an airtight container until serving.

This recipe will make a dozen sandwich cookies, so we typically double it every time we make it.  And while you could definitely make your own frosting and/or switch up flavors, this is a tried-and-true winner.  Try them for your next tailgate or birthday party.  Dig in!

Peanut Butter & Chocolate Ganache Brownies

Brownies are one of those universally-loved treats, perfect for almost any occasion.  On a recent trip to visit some friends I was making “anything chocolate” for a birthday dinner and came up with this elevated version of brownies.  The great part is that you don’t have to be a master baker to delight your friends and family.  Your favorite box mix gets dressed up with the addition of a rich layer of dark chocolate ganache and homemade peanut butter buttercream frosting – wow!

FullSizeRender 6

PEANUT BUTTER & CHOCOLATE GANACHE BROWNIES

Ingredients

  • 1 Box Dark Chocolate Brownie Mix

Chocolate Ganache

  • 12 Ounces Semisweet Chocolate Chips
  • 3/4 Cup Heavy Cream
  • 1 Tbs. Strong Fresh-Brewed Coffee

Peanut Butter Buttercream

  • 1 Cup Creamy Peanut Butter
  • 1/2 Cup Unsalted Butter, Softened
  • 1 Box (15 oz.) Powdered Sugar
  • 1/2 Cup Milk
  • 1 1/2 Tsp. Vanilla
  • 1/4 Tsp. Salt

Instructions

  • Prepare box mix brownies according to directions in a 13×9 pan.  I like using dark chocolate brownies, but milk chocolate would work well too.  Avoid buying anything with chocolate chunks or chips because the ganache is rich enough on its own.
  • Allow brownies to cool.
  • Over a double boiler, or in a metal bowl over a simmering pot of water, combine all ganache ingredients.
  • Stir occasionally for 10-15 minutes until chips melt and mixture becomes smooth and is fully combined.
  • Remove from heat and allow to cool for 10 minutes.
  • Pour cooled ganache over baked brownies.  Use a spatula to spread evenly across the pan.
  • Place in refrigerator.
  • In a large mixing bowl, use a hand mixer to cream together peanut butter, butter, vanilla and salt.  Mixture should be smooth and fluffy.
  • Add 1/4 of the powdered sugar and mix well.  Continue adding fourths of all powdered sugar until fully combined.  Mixture will be thick.
  • Add half of the milk and mix until frosting becomes thinner.  You can continue to add as much milk as needed to make frosting light and spreadable.  Buttercream is usually fairly thick and this will be a little bit more so because of the peanut butter.
  • Remove brownies from fridge and spread frosting evenly over the entire pan.  Depending on your taste, you make only want to use 3/4 of the frosting mixture.  if you like a lot, then use it all!
  • Cover pan and store brownies in refrigerator until ready to serve.
  • Use a sharp knife to cut ample squares and serve.

These were a huge hit this weekend and for good reason!  They’re super-rich and decadent and everyone will think you’re a baking wizard.  Taking the guesswork out of the brownies themselves with a box mix keeps this easy.  Give them a try and let me know how much you and your family love the chewy deliciousness.  Dig in!

Chippy Ice Cream Sandwiches

Cookies and ice cream are BFF’s in my latest dessert creation.  To be honest, this is way easier than it sounds given that I already have an awesome recipe for Butterscotch Chocolate Chip Cookies on my blog from the holidays.  With a few tweaks, you’ll have the perfect homemade sandwiches for your next picnic, birthday party or just for an occasional sweet treat!

FullSizeRender 3

CHIPPY ICE CREAM SANDWICHES

Ingredients

Instructions

  • Preheat oven to 375 degrees.
  • Prepare cookie dough recipe per instructions.
  • On a parchment-lined baking sheet, spread out dough into a single layer.
  • Bake 14-18 minutes or until edges are golden brown and center is set.  The ice cream sandwiches actually stay together and cut better if the cookie is a little under-done.
  • Remove from oven and allow to cool completely in pan.
  • Remove ice cream from freezer and allow to thaw 10-15 minutes until it is spreadable, but not runny.
  • Cut cookie in half and turn one half over so it is bottom-side up.  Spread entire half gallon of ice cream in an even layer on cookie and top with the other half.  Press and twist slightly to get good contact.
  • Place entire cookie sheet in freezer and chill for 4-6 hours.
  • Remove from freezer and cut into bars with a sharp knife.  Serve immediately or store in zippered plastic bags in the freezer for up to one month.

FullSizeRender

With a little time and patience, you can make these super-decadent treats all summer long!  Make them festive by substituting M&M’s for the chips or using different flavors of ice cream.  Want to take it over the top?  Make a quick chocolate ganache, dip half of each sandwich in it and then into colored sprinkles!  The possibilities are endless when you have a good cookie recipe and quality ice cream – just make sure you have a sturdy batter that doesn’t get too crispy or it won’t hold up or cut properly.  Dig in!

Banana Nut Bread

We’ve all run into the end of the week where our bananas are getting a little ripe – it’s time to make banana bread, muffins, foster and anything else we can think of!  My moist recipe has a little twist on tradition with the addition of orange zest and cinnamon.  It’s the perfect weekend companion to your morning coffee.

FullSizeRender 6

BANANA NUT BREAD

Ingredients

  • 1 3/4 Cups Flour
  • 1 1/2 Tsp. Baking Powder
  • 1/2 Tsp. Baking Soda
  • 3/4 Tsp. Salt
  • 1/2 Tsp. Cinnamon
  • 1/3 Cup Butter-Flavor Shortening
  • 2/3 Cup Sugar
  • 1 Tbs. Orange Zest
  • 1/2 Tsp. Vanilla
  • 2 Eggs
  • 3 Ripe Bananas, Mashed
  • 1/2 Cup Chopped Walnuts

Instructions

  • Preheat oven to 350 degrees.
  • In a small bowl, mix together flour, baking powder and soda, salt and cinnamon.  Set aside.
  • In a large bowl, cream together sugar and shortening.  Add in eggs, orange zest, vanilla and bananas.  Mix until thoroughly combined – I use a hand-mixer here.
  • Using a spatula or wooden spoon, mix dry ingredients into wet until combined.  Fold in walnuts.
  • In a loaf pan sprayed with cooking spray, pour batter and gently tap pan to remove air bubbles.
  • Bake at 350 degrees for 40-45 minutes or until a toothpick comes out clean.
  • Remove from oven and let rest for 10 minutes.  Turn out onto a wire rack and allow to cool completely.
  • Serve immediately or store for up to 3 days.

FullSizeRender 7

I love the crunchy addition of walnuts in this recipe.  If you don’t like them, chocolate chips are a great substitution – kids love it!  The hint of orange will bring out the best flavor of either option.  If you really want to go over the top, consider making a glaze out of a cup of powdered sugar and 2 Tbs. orange juice.  This recipe isn’t overly sweet and the glaze could be just enough for those that like the sweeter side.  Dig in!

Peanut Butter Buckeyes

If you’re from Ohio, you’ve likely had the peanut buttery goodness of BUCKEYES!!  Shaped like the seed from our state tree, these namesake treats are a hit for the holidays or any time of the year.  You’ll find them at almost any store in Ohio that sells confections and definitely at Ohio State football tailgates!  Good news is, you don’t have to be an OSU fan or from Ohio to love the perfect combination of peanut butter and chocolate – just ask all of our Minnesota friends who clamored for a treat box of Buckeyes around the holidays.

FullSizeRender 6.jpg

PEANUT BUTTER BUCKEYES

Ingredients

  • 18 Ounces Creamy Peanut Butter
  • 1 Lb. Powdered Sugar
  • 1/4 Cup Margarine
  • 12 Ounces Semisweet Chocolate Chips
  • 1/2 Ounce Parafin Wax

Instructions

  • Using a stand mixer (you’ll need a heavy duty one) with a dough hook attachment, cream together peanut butter and margarine until smooth.
  • Add powdered sugar a little at a time and mix on low until thoroughly combined.
  • Roll into one inch balls and place on a cookie sheet lined with parchment paper.
  • Place balls in freezer for 15 minutes to harden.
  • While peanut butter balls are in the freezer, use a double boiler (or a metal bowl over a pot of simmering water) to melt chocolate chips and wax together.
  • Remove balls from freezer.  Using a toothpick, pierce each ball and dip 3/4 of the way into chocolate/wax mixture.  Place on parchment paper.  Chill a full tray in the freezer again for 10 minutes or until chocolate is set.
  • Keep stored in an airtight container.  I like to keep them in the fridge, but they’re fine at room temperature too.

There’s little practice involved in the dipping process, but overall these are really easy to make.  A good tip is to use a small bowl or boiler for the chocolate as you want the chocolate to be deep enough to dip into.  You can also make 1 1/2 of the chocolate/wax mixture to make it easier.  We like to then use the excess chocolate to dip pretzels in.  Or try mixing in enough corn flakes to coat them thoroughly.  Drop in small spoonfuls on a parchment-lined cookie sheet and top with sea salt flakes – wow are those good!  Try the buckeyes, share with your family and friends and make it a favorite holiday tradition like it is for us.  Dig in!!

My Favorite Layered Cheesecake

For my entire life my mom has been making her family cheesecake recipe for the holidays and special occasions.  And as I learned to cook, I began making the same recipe that her grandmother made for as long as she can remember.  So what’s the big deal?  First, you make it in a 13 x 9 pan – so you know there’s plenty to go around and then some!  Second, rather than a single layer of dense creamy goodness, this recipe calls for a rich sweet cream cheese layer and is topped with a sour cream and sugar mixture that gives a secondary texture and a slight bite.  It’s easy to make, but everyone will think you spent a ton of time on it – read how simple it is below.

fullsizerender-9

MY FAVORITE LAYERED CHEESECAKE

Ingredients

Crust:

  • 2 Cups Graham Cracker Crumbs
  • 1/4 Cup Sugar
  • 1/3 Cup Melted Butter

Filling:

  • 3 Bricks (8 Oz. each) Cream Cheese, Softened
  • 1 Cup Sugar
  • 5 Eggs, Room Temperature
  • 1 1/2 Tsp. Vanilla

Topping:

  • 24 Oz. Sour Cream
  • 4 Tbs. Sugar

Instructions

  • Preheat oven to 325 degrees.
  • In a small bowl, thoroughly mix crust ingredients with a fork.  Pour into a 13 x 9 metal baking pan and press firmly and evenly.  Set aside.
  • In a large bowl or stand mixer, lightly beat cream cheese until smooth.  Add 1/4 Cup sugar and beat.  Add one egg and beat.  Continue alternating until all sugar and eggs have been combined with cream cheese.  Mixture should be smooth and free of any lumps.
  • Mix in vanilla and then pour mixture over crust in pan.
  • Bake at 325 degrees for 45 minutes.
  • Remove from oven.
  • Turn oven up to 425 degrees while you mix topping.
  • Stir together sour cream and sugar until combined and smooth.  Pour and spread evenly over baked cheesecake.
  • Return to oven and bake at 425 degrees for 10 minutes.
  • Remove from oven and allow to cool completely.  Cover and refrigerate for at least 4 hours before serving.

I hope you love this decadent dessert as much as my and my wife’s family do!  It will surely be a hit and requested for all of your family functions.  While we aren’t formal and normally serve it out of the pan, you can cut and arrange on a platter for a party, shower, etc.  I recommend using a sharp knife and dipping it in warm water after each cut to prevent sticking and to achieve perfect squares for serving.  Dig in!!