H-M-G Iced Green Tea

The early heat of this summer calls for cool refreshment!  I love iced tea and have taken a liking to using green tea as a lighter alternative to traditional varieties.  Try this sun-brewed recipe for my Honey, Mint and Ginger tea to add flavor and sweetness for a perfect summer afternoon or a little happy hour cocktail with the addition of vodka and a splash of soda water.
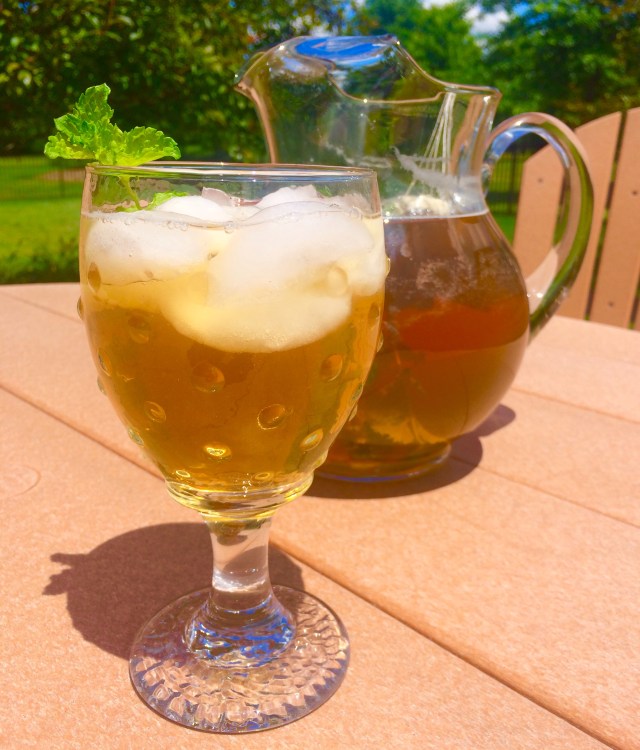
FullSizeRender

HMG Iced Green Tea

Ingredients

  • 2 Quarts Water
  • 4 Green Tea Bags
  • 1/4 Cup Honey
  • 1 “Thumb” Fresh Ginger
  • 3 Large Sprigs Fresh Mint

Instructions

  • Peel a thumb-sized piece of fresh ginger and cut into slices.
  • In a small saucepan, combine two cups water, honey and ginger.  Bring to a boil and then turn down to let simmer for 5 minutes.
  • In a large glass pitcher, combine remaining water, tea bags, mint and honey/ginger liquid.
  • Cover pitcher with plastic wrap and place outside in the sun.  Allow to step for at least 4 hours.
  • Remove tea bags and mint.  You can also remove ginger pieces, but I like to leave them in to continue to flavor the mixture.
  • Serve over ice.

If you’re feeling like a cocktail, add 2 ounces of good vodka to an ice-filled glass, fill 3/4 with tea and then top with soda water.  Garnish with mint sprigs and an orange slice.  Either way you make it, sit back, sip and enjoy!!

Chocolate Chip Zucchini Bread

Looking for a little something sweet and satisfying to go with your morning coffee?  Try this take on a run-of-the-mill zucchini bread recipe.  With sour cream for moistness and semi-sweet chocolate chips this sweet bread is perfect for breakfast, dessert or your upcoming 4th of July picnics!

CHOCOLATE CHIP ZUCCHINI BREAD

Ingredients

  • 4 Eggs
  • 1 1/2 Cups Sugar
  • 2 Tsp Vanilla
  • 3/4 Cup Vegetable Oil
  • 1/2 Cup Sour Cream
  • 2 Cups Grated Zucchini
  • 2 Cups All Purpose Flour
  • 2 Tsp Baking Powder
  • 1 Tsp Baking Soda
  • 2 Tsp Cinnamon
  • 1/2 Tsp Ground Mace
  • 1 Tsp Salt
  • 1 Cup Semi-Sweet Chocolate Chips

Instructions

  • Preheat oven to 350 degrees.
  • In a large bowl, beat eggs until frothy.  Add sugar and beat until sugar is dissolved and mixture is creamy.
  • Add vanilla, oil and sour cream.  Mix thoroughly.
  • Drain grated zucchini in a colander and stir into mixture until evenly distributed.
  • In a separate bowl, sift together flour, baking powder, baking soda, cinnamon, mace and salt.
  • Pour dry ingredients into wet and mix until well combined.  Do not over-mix.
  • Fold in chocolate chips until evenly distributed.
  • Pour mixture into a buttered and floured bundt pan or 2 loaf pans.
  • Bake at 350 degrees for 45-50 minutes or until a toothpick comes out clean.
  • Allow to cool in pan for 10 minutes and then turn out to a wire rack to cool completely.

IMG_1700

This is a very simple recipe that can be made with variations.  Try substituting 1 cup chopped walnuts for the chocolate chips or a half cup drained crushed pineapple and a half cup raisins for the chocolate chips.  I’d love to hear what combinations you come up with and how they turn out.  Dig in and enjoy!!

Blueberry Buttermilk Mega Muffins

You’ll feel like you’re having a “vacation brunch” when you bake my favorite blueberry muffins!  Chock-full of sweet blueberries these dense tangy muffins are best when made in huge muffin tins.  This recipe yields just 6 muffins, but it’s tough to eat a whole one yourself.  Make them for your next weekend guests or for a lazy weekend morning on the patio with your iced coffee!

IMG_1629

BLUEBERRY BUTTERMILK MEGA MUFFINS

Ingredients

  • 2 1/2 Cups All Purpose Flour
  • 1 Cup Sugar
  • 1 1/2 Tsp Baking Powder
  • 1/2 Tsp Salt
  • 1 Stick Melted Butter
  • 2 Eggs, Beaten
  • 1 1/4 Cups Buttermilk
  • 1 1/2 Cups Fresh Blueberries
  • 1 1/2 Tbs Large Crystal Sugar

Directions

  • Preheat oven to 400 degrees.
  • Stem and rinse blueberries and dry thoroughly on paper towels.  Set aside.
  • In a large bowl, sift together the first 4 dry ingredients.
  • Add beaten eggs and buttermilk to dry ingredients and mix just enough to combine.
  • Stir in melted butter until mixture is smooth.  It will be a thick batter vs. loose like cake batter.
  • Reserve 20-25 blueberries.  Gently fold remaining blue berries into batter until just evenly combined.
  • Spoon batter into large muffin tins (6 to a tray) that have been sprayed with cooking spray.
  • Use remaining blueberries to top muffins and then sprinkle evenly with crystal sugar.
  • Bake for 25-30 minutes until a toothpick inserted comes out clean.
  • Allow finished muffins to cool in pan for 10 minutes and then remove to a wire rack to cool completely.

FullSizeRender

My mom made these muffins for me years ago and they are some of my favorites!  I’ve tweaked the recipe since to get just the right density and amount of fruit to hold them together.  I love them with blueberries, but they are excellent with mixed berries as well.  Try some variations and let me know what you think!

Easy Baby (Got) Back Ribs

Is BBQ a food group?!  I believe it should be – a lot of people would agree with me based on America’s obsession with BBQ cooking, restaurants and TV shows.  Baby back ribs are sometimes intimidating for people to cook at home, but they don’t have to be.  Whether braised, smoked, oven-baked or grilled I have a fool-proof method for tender ribs that will make you look like a pro!  The key takeaway from the recipe below is the method.  You can vary rubs and sauces, but by following these steps, you’ll always turn out competition-worthy ribs.

EASY BABY (GOT) BACK RIBS

Ingredients

Directions

  • Remove ribs from packing and pat dry with paper towels.
  • On the back side of the ribs, insert a knife under the silver skin until you can grab enough of it with your hand.  Remove the entire silver skin from the back of the ribs to allow for better cooking and more tender meat.  It may be easier if you use a towel or paper towel to grab the silver skin.
  • Using a sharp knife, cut the rack in half for easier cooking.
  • Generously sprinkle all sides of the ribs with your dry rub.  I love using Butt Rub, but there are tons of great dry rubs out there.  I’ll have a future post with several rub recipes you can make yourself!  Rub the seasoning into the meat well.
  • No matter your method of cooking, you want to take two steps.
    • First, place the ribs in a metal rack on your grill or on a cookie sheet for your oven and cook for 2 hours at 275 degrees.  On the grill, cook them over indirect heat – they will dry out and become tough on the outside.
    • After two hours, place both halves into a large piece of doubled-up foil.  Put butter and cider vinegar in the foil and seal completely.  Place back in the oven or on the grill for 1 hour.
  • Remove ribs from grill or oven and from foil wrap.  Discard foil and cooking juice.
  • The ribs are fully cooked and tender at this point.  I like to finish them over low direct flame on the grill and add sauce.  You can also sauce them in the oven if you prefer.  Either way, over the next 15-20 minutes, brush rib liberally with the sauce of your choice turning the ribs often to avoid burning.

IMG_1627

Follow this method and you should turn out beautiful ribs that have tender meat pulling away from the bone!  I use one of our local Cincinnati favorites – Montgomery Inn BBQ Sauce for a rich sweet flavor.  Try these with your own local favorite or homemade sauce.  I’ll have a few recipes in future posts for that too!  Send me pictures and stories of your best effort – I’m sure you’ll wow friends and family with this recipe…

Buttermilk Biscuits

There’s something about a warm homemade biscuit that’s really comforting.  Maybe it’s the Southerner in me or it’s the soft flaky pillow that can be the vehicle for so many delicious things.  I’v heard a lot of people say they have a hard time making good biscuits.  While these weren’t my best effort, they were pretty good.  The recipe is solid, but the handling of the dough and cutting make all the difference in the world.  Give them a try and let me know your experience – I’d love to hear what went well and didn’t.

IMG_1604

BUTTERMILK BISCUITS

Ingredients

  • 2 Cups All-Purpose Flour
  • 1/2 Tsp Baking Soda
  • 1 Tbs Baking Powder
  • 1 Tsp Salt
  • 6 Tbs Cold Butter
  • 1 Cup Buttermilk

IMG_1599

Directions

**I find this easier in a food processor, but you can definitely make these by hand

  • Preheat oven to 425 degrees.
  • In a food processor, combine the first four ingredients.  Pulse a few times to mix thoroughly.
  • Making sure your butter is very cold, cut into 12 small pieces and place in food processor.  Pulse until mixture is crumbly and looks like lumpy sand.  You should have small chunks of butter evenly throughout the mixture.
  • Add one cup of buttermilk and pulse just until mixture comes together.  It should be fairly wet and you may need to add a bit more buttermilk.
  • On a floured surface, turn out biscuit dough and form into a flat 1-inch piece.  Fold onto itself 5-6 times and flatten again.  DO NOT overwork dough as this can develop the gluten and make for tough biscuits.  DO NOT use a roller, but pat with your hands only.
  • Using a biscuit cutter or other round implement of choice, cut out biscuits and place on a cookie sheet.  If you want your biscuits to rise more while baking, make sure they are touching on the cookie sheet.  Some people like to bake them in a 9-inch round pan as well.
  • Bake at 425 degrees for 8-12 minutes until golden brown.  You can brush the tops with melted butter when they come out of the oven.

FullSizeRender 2

This is a very basic recipe, but it can be changed in numerous ways.  Think about adding rosemary and cracked black pepper and topping with sea salt.  What about cheddar cheese and jalapeño?  The possibilities are endless, but I’d love to hear what you try!  Eat these with a thick pat of butter and honey or do something inventive.  This time I made breakfast sandwiches with country ham, sharp cheddar and over-easy eggs.  I also used it as the base for a country-style strawberry shortcake.  Any way to like them, it’s easy to make them homemade and your family and friends will love you for it.

Asian-Glazed Grilled Swordfish Skewers

When you travel a lot for work, it feels great to be home for a week and get creative in the kitchen.  Feeling the heat of summer means keeping it light with this twist on traditional grilled kabobs.  Swordfish is meaty and will stay on a skewer and hold up on the grill.  It feels like a stick-to-your-ribs meal with the addition of Brussels sprouts and cremini mushrooms al covered in a tangy Asian-inspired glaze.  The combinations are endless, but give this a try for something new and different without stacking on the fat and calories.

ASIAN-GLAZED GRILLED SWORDFISH SKEWERS

Ingredients

  • 1 Lb Swordfish Steak(s)
  • 8 Cremini Mushrooms
  • 12-16 Brussels Sprouts
  • 3 Green Onions, Sliced Thinly

Asian Glaze

  • 3 Tbs Light Soy Sauce
  • 2 Tbs White Wine Vinegar
  • 2 Tbs Honey
  • Juice & Zest of 1/2 Lime
  • 1 Clove Garlic, Minced
  • 1 Tsp Grated Fresh Ginger

IMG_1572

Directions

  • Clean and trim Brussels sprouts.  Steam on stovetop or microwave for 7 minutes, until slightly soft.
  • Cut swordfish into 1 1/2 inch cubes.
  • Alternate fish, Brussels sprouts and mushrooms on skewers.  DO NOT overcrowd them or they won’t cook evenly!
  • In a small bowl mix all ingredients for the Asian glaze.
  • Grill skewers on medium heat for 5-6 minutes, turning twice.  Lightly brush skewers with glaze and continue to cook for an additional 5-6 minutes.  Turn and glaze every minute or so.  Fish should be opaque and firm to the touch.
  • Remove skewers from grill, glaze once more and serve over white sticky rice.  Finish with sliced green onions.

IMG_1576

These don’t take long to grill, so it’s important that you steam the Brussels sprouts ahead of time or they won’t cook through.  Also, there is an absence of salt and pepper in this recipe because the glaze seasons everything really well.  If you like things a little spicy, I would replace the garlic clove with a tablespoon or two of sriracha.  Either way, this is a healthy dinner that’s filling and good for you too.  Let me know how it goes and what you changed!

Flatbread With Prosciutto, Cremini Mushrooms & Fontina

Let’s face it, we all hit our days when we’re tired and say “let’s just order a pizza”.  And I’m sure I’ve spent an uncomfortable amount of money with the likes of Jet’s, Papa John’s and the rest.  It’s awfully easy though to keep frozen dough or pre-made crusts at home and make your own without a ton of effort either.

This flatbread pizza was made with a crust we bought at our local farmers market from White Oak Valley Farm.  Using fresh summer squash and zucchini mixed with flour, eggs, mozzarella, garlic and herbs, they sell these fantastic pre-baked crusts that are perfect for light summer pizzas.  It’s not thick or heavy and won’t stand up to a ton of toppings, but it worked great here.  Give this recipe a try with naan bread, traditional crust or something to your liking.

IMG_1570

FLATBREAD WITH PROSCIUTTO, CREMINI MUSHROOMS & FONTINA

Ingredients

  • 1 12″ Pizza Crust or Flatbread
  • 1 Tbs Extra Virgin Olive Oil
  • 1 Clove Garlic, Minced
  • 4 Thin Slices Prosciutto
  • 4 Cremini Mushrooms, Sliced Thinly
  • 3/4 Cup Freshly Grated Fontina Cheese
  • 6-7 Basil Leaves, Sliced or Torn

Directions

  • Preheat oven to 375 degrees.
  • Place pizza crust on baking stone or cooking sheet.
  • Mix olive oil and garlic and brush over entire pizza crust.  Our crust is seasoned already, but I would salt and pepper here if mine was not.
  • Arrange mushrooms on pizza and then sprinkle cheese over entire pie.
  • Tear prosciutto piece in half and drop on pizza in small “piles”.  I baked the pizza with it on there, but I think it would actually be better to either put it on after baking or to crisp it in the oven and then sprinkle crumbles on the pizza for baking.
  • Bake in oven according to pizza crust directions.  Ours was only 15 minutes due to the thin crust.
  • Remove from oven and top with basil.

The crust and the technique may be different, but the recipe here is the combination of ingredients and the light topping vs. a heavy and greasy delivery pizza.  Let me know if you try this and what other combinations you come up with!

The Best Special-Sauced Grilled Chicken

I have a decent “poker face”, but it’s tough to hide my disappointment when I see someone grilling/serving dried-out, boneless skinless chicken breast.  I know it has its place on some menus, but chicken on the bone is so much more flavorful!  If you take your time and master the technique, you’ll be saying adios to the “old beige standby”.  I love all kinds of seasonings and sauces, but this tried-and-true recipe I use all year long on grilled chicken and wings.  You’re going to love it!

IMG_1563

Best Special-Sauced Grilled Chicken

Ingredients

  • 1 Whole Chicken, Cut Into Pieces (2 Each – Wings, Thighs, Breasts and Legs)
  • 1 Tbs Seasoned Salt
  • 1 Tbs Black Pepper

Special Sauce

  • 1/2 Stick Butter
  • 1/4 Cup Crystal Hot Sauce
  • 1/4 Cup The Original Tiger Sauce

Directions

  • Rinse and dry chicken pieces.  Season all sides liberally with seasoned salt and pepper.  You can season with anything, but one of my favorites is Butt Rub.  You can find it at buttrub.com or you can also mix your own.  I’ll provide some rub recipes in a another post.
  • Grill chicken on medium-low heat turning often to avoid burning skin.  Know your hot spots on your grill and rotate pieces as needed.  You can put put the breasts on 10 minutes before the rest of the pieces since they are larger.  Cook all pieces for 25 minutes.  They will need another 10-15, but you can sauce through the last of the process.
  • In a microwaveable bowl, melt butter and then add both sauces.  I recommend Crystal Hot Sauce for spice and The Original Tiger Sauce for a sweet/hot addition.  Stir together until fully mixed.  This spicy-sweet sauce is not quite buffalo, but close enough that you’ll want to put in on wings too!
  • Brush sauce on chicken pieces and allow to cook2-3 minutes.  Turn and continue this process 4-5 times using all sauce and juices run clear in chicken.

If you follow this simple process, you’ll have savory grilled chicken with crispy skin and a spicy/sweet sauce.  It might take some practice, but once you master it, you’ll make this a standby for your grilling season.  Dig in!

Pimento Cheese Dip and BLT Dip

Memorial Day Weekend is always a blast whether you’re cooking out at home, sitting by the pool or camping with family – like we are this weekend!  There’s plenty of time to eat healthy all year long, so take the holiday opportunity to dive into these fantastic dips.  They are both fatty, decadent and will absolutely make you a hit at any party you pop in on!

IMG_1550

PIMENTO CHEESE DIP

Ingredients

  • 1 Lb Block Sharp Cheddar Cheese
  • 1 Cup Mayonnaise
  • 1 4 Oz Jar Pimentos

Directions

  • Use the largest holes on a box grater and shred cheddar cheese.  DO NOT buy shredded cheese.  The anti-caking agent and shape will not give you the right taste or consistency.
  • In a bowl, mix together shredded cheese, mayonnaise and drained pimentos.
  • This dip tastes best if you let it chill for at least 2 hours.

Serve this dip with your favorite crackers, crusty bread, celery or other veggies.  It is also delicious on top of a burger or as the filling for a grilled cheese!

IMG_1552

BLT DIP

Ingredients

  • 2 Lbs Hickory Smoked Bacon
  • 16 Oz Sour Cream
  • 16 Oz Mayonnaise
  • 2 Large Ripe Tomatoes

Directions

  • Dice bacon into small pieces and render until brown and crispy in a non-stick pan.  DO NOT use thick cut bacon here as it doesn’t provide the right consistency.  Cutting the bacon raw and then rendering makes it really easy vs. frying strips and then crumbling.
  • Remove bacon from grease and drain on paper towels.  Allow to cool completely.
  • In a mixing bowl, combine mayonnaise and sour cream.
  • Seed and cut tomatoes into 1/2-inch dice.  Add to mayo mixture.
  • Stir in cooled bacon pieces and allow to chill for 2 hours before serving.

OK, so there’s no lettuce, but BLT is what we’ve always called this dip!  It’s fantastic with Fritos, Triscuits or butter crackers.  Any way you try it, you’ll love it…and your friends/family will love you for bringing it!  Happy Memorial Day all!

Southwest Turkey Burgers w/Guacamole

Weekdays are tough to create interesting dinners with busy work schedules, activities, etc.  Even firing up the grill, something like a turkey burger can be pretty pedestrian, but it doesn’t have to be.  Try this Southwest twist on the ol’ bird-patty, we loved it!

SOUTHWEST TURKEY BURGERS

Ingredients

  • 2 1/4-Lbs Turkey Burger Patties
  • 1 Tbs Taco Seasoning
  • 1 Medium Red Onion
  • 1 Tsp Olive Oil
  • Salt & Pepper
  • 2 slices Colby Jack Cheese
  • 2 Buns, Lightly Buttered

Directions

  • Preheat grill and dust both sides of each turkey burger with taco seasoning.
  • Slice red onion into 1/2 inch thick slices, brush lightly with olive oil and salt and pepper each side.
  • Grill turkey burgers and onion slices over high heat for 4-5 minutes per side.  Juices should run clear for the burgers.  Onion slices should be charred and soft, but hold together.
  • Place cheese on burgers and place buns, buttered side down, on the grill.  Take everything off grill and assemble burgers on buns.  Top with a slice of grilled onion and a healthy dollop of guacamole.

These are super easy to make and always turn out like a restaurant-quality burger.  Don’t be afraid to play with the toppings and add/substitute salsa, hot sauce, pickled jalapeño or pepper jack cheese!

FullSizeRender 17

EVERYDAY GUACAMOLE

Ingredients

  • 2 Ripe Avocados
  • 1/4 Red Onion, Diced
  • 4 Campari Tomatoes, Seeded & Diced
  • 2 Tbs Fresh Lime Juice
  • Salt & Pepper To Taste

Instructions

  • Core, scoop and dice avocados and place into bowl.
  • Pour lime juice over avocado and add tomatoes and onions.
  • Liberally season with salt and pepper and mix well.  I like mine a little chunky, but mix and mash with a fork to your desired consistency.

This is the basic recipe for guac in our house.  It’s easy to multiply if you need more for a party.  I also like to add garlic and/or jalapeño depending on what I’m using it for.  Seriously, always keep these ingredients on hand because it couldn’t look more like culinary genius when you pull this together last-minute for guests or just an impromptu beer or margarita on the patio!