Italian Beef

My mom has this great recipe for Italian beef that we’ve enjoyed for years.  As with all recipes though, I wondered “what would make this better?”  Now, improving on mom’s cooking is a delicate matter (go ahead, ask her!) so I wholly admit that her version is rock-star.  What I love about this recipe is that you can make it ahead and easily put it in the oven for a family gathering without having to go through a lot of fuss.

FullSizeRender 2

ITALIAN BEEF

Ingredients

  • 3-4 Lbs. Top Sirloin Roast
  • 8 Whole Garlic Gloves, Peeled
  • 1 1/2 Tbs. Olive Oil
  • 2 Tbs. Dried Italian Herbs

For The Au Jus

  • 1 Envelope Dry Italian Dressing Mix
  • 1 Envelope Brown Gravy Mix
  • 1 1/2 Tsp. Worcestershire Sauce
  • 1 Tsp. Red Pepper Flakes
  • 1/2 Tsp. Black Pepper
  • 1 1/2 Cups Warm Water

Instructions

  • Preheat oven to 375 degrees.
  • Tie roast with 4-5 rings of cooking twine to hold together.  Place in a shallow roasting pan.
  • Make eight slits in the top of the roast and put a clove of garlic in each slit.
  • Rub roast with olive oil and then sprinkle with Italian herbs.
  • Place in oven and roast for 1 1/2 – 2 hours or until the internal temperature reaches 120 degrees.
  • Remove from oven, tent with foil and allow to cool completely.
  • Place roast in refrigerator for 24 hours.
  • Using a very sharp knife or meat slicer, cut cold roast beef into 1/4-inch slices.  Garlic pieces will fall out as you slice it – keep them!
  • Place sliced beef and garlic in an oven-safe baking dish.  Shallow is better.
  • In a medium bowl, combine au jus ingredients and whisk until thoroughly combined.
  • Pour over sliced beef.  Cover with foil and bake in a 325 degree oven for 1 hour until beef is warmed through.  You can also put this back in the fridge and store for up to two days before baking and serving.
  • Serve immediately after baking.

IMG_0781

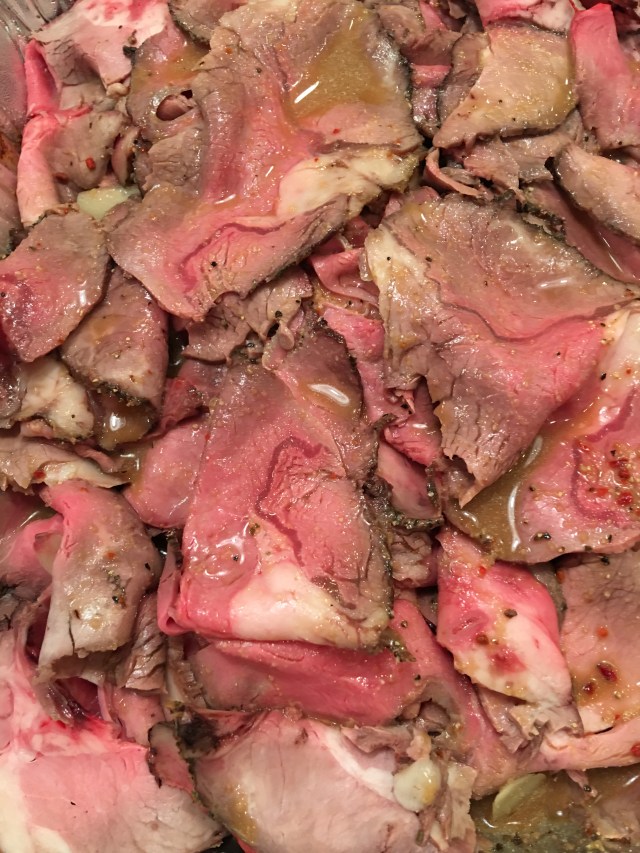
We typically enjoy this rich bold beef on ciabatta rolls with a slice of provolone cheese and a little horseradish and wow, are they good!  You’re going to want to pour some of that wonderful au jus on that roll to soak in and give you an exceptional bite every time!  Try dressing it up in a sandwich with giardiniera or sautéed mushrooms and onions – the possibilities are endless.  It’s an awesome main dish for a buffet too, everyone loved it on Easter Sunday.  Give this one a try and let me know what variations you come up with, I’d love to hear your ideas.  Dig in!

Loaded Ranch Roasted Potatoes

Want to serve loaded baked potatoes to a crowd without everyone having to top their own spud?  This tasty recipe requires just a little prep and feeds a lot of people.  Delicious loaded crispy potatoes with a hint of ranch flavor will be sure to satisfy your family and friends at your next gathering.  They’re equally perfect with steaks on the grill or as appetizers for a party or the big game.

FullSizeRender 5

LOADED RANCH ROASTED POTATOES

Ingredients

  • 6-8 Medium Russet Potatoes (depending on size)
  • 2 Tbs. Canola Oil
  • 1 Envelope Ranch Dressing Mix
  • 2 Cups Shredded Cheddar Cheese
  • 3/4 Cup Bacon Bits
  • 4 Green Onions, Chopped
  • Sour Cream (for topping)

Instructions

  • Preheat oven to 375 degrees.
  • Scrub potatoes thoroughly under cold water and set aside to dry.  Cut into 2-inch cubes, leaving skin on.
  • Place cut potatoes in a large bowl and drizzle with canola oil.  Toss to coat.
  • Sprinkle ranch dressing mix over potatoes and toss again to evenly coat.
  • Spread potatoes in a single layer on a foil-lined baking sheet that has been sprayed with cooking spray.  The spray will prevent sticking due to the ranch mix – DON’T SKIP THIS STEP!
  • Bake at 375 degrees for 40 minutes or until potatoes are fork tender and lightly browned.  Remove from oven.
  • Sprinkle baked potatoes with cheddar cheese and bacon bits.  Return to oven for 5-10 minutes until cheese is fully melted.
  • Remove from oven and top with chopped green onion.
  • Serve immediately.

Every time we make these they are a huge hit!  Serve with sour cream for topping.  Want to mix it up a little bit?  Try substituting 3 Tbs. of taco seasoning for the ranch and use a combination of cheddar and pepper jack cheese.  Serve with jalapeños and hot sauce – instant fiesta!  I’d love to hear what combinations you come up with.  Try them for your next Sunday supper or for a Masters watch party this weekend.  Dig in!

Cold Smoked Salmon or Steelhead Trout

If I’m near a bagel shop, I’m hard-pressed to not snag a smoked salmon bagel.  There’s something about the melty salty salmon combined with onions, whipped cream cheese and capers that gets me every time!  Naturally, I said to myself recently, “I can do this at home”.  Sure enough, I figured out a great process to make my own smoked fish that’s fresher and tastier than anything I’ve had before.  This recent recipe was made with a steelhead trout fillet, but can be replicated with salmon as well.

FullSizeRender

COLD SMOKED SALMON OR STEELHEAD TROUT

Ingredients

  • 2-3 Lbs. Salmon or Steelhead Fillet
  • 1 1/2 Cups Kosher Salt
  • 1/2 Cup Light Brown Sugar
  • 1 Tsp. Black Pepper

Instructions

  • Inspect your fish for any pin bones and remove.  Rinse fillet and dry completely with paper towels.
  • In a small bowl, combine salt, sugar and pepper.  Mix thoroughly.
  • Spread 1/3 of salt mixture in a glass baking dish to completely cover the bottom.
  • Place fish on the salt mixture, skin-side down.  Cover the fish with the remaining salt mixture and pat lightly to make sure it adheres.
  • Cover dish with plastic wrap and refrigerate for 24-48 hours.
  • After curing, remove fish from fridge, take out of glass dish and rinse under cold water to remove salt mixture.
  • Dry completely and place on paper towel on a cookie sheet.  Put in fridge and allow to dry for 3-4 hours uncovered.  Flesh will be firm and slightly tacky.
  • Cold smoke fish with alder or another mild wood at 120 degrees for 90 minutes.  I smoke mine over a foil pan filled with ice to prevent the fish from cooking.  The goal is to impart the smoke flavor only.
  • Remove from smoker and refrigerate.  Slice thinly and serve.  It will remain fresh in a ziplock bag for 7-10 days.

I love when a recipe relies on just a few ingredients, but tastes like a million bucks.  The technique here isn’t difficult, but the result is delicious and better than most store-bought versions.  Imagine the oohs and ahhs when you serve your homemade smoked salmon for your next brunch!  Take the time and give it a try, I think you’ll love the process and I know you’ll love the end product.  Dig in!

Rosie’s Fish Fry Coating

For many years my wife’s grandparents lived on Lake Okeechobee in Florida and would bring us the best lake perch caught and cleaned by papaw himself.  In fact, there was always money waiting if you could find a bone – he never had to pay out on that one!  Rosie would fry that fish in a light crispy cornmeal coating that always seemed impossible to make myself.  Eventually, she passed down the recipe and I have been using it, and the very specific ingredients, ever since.

FullSizeRender 11.jpg

ROSIE’S FISH FRY COATING

Ingredients

Instructions

  • Mix all ingredients together in a 13×9 dish.  It will be easier to coat fish this way.
  • Dip fish or chicken fillets in whole milk and then into your fish fry coating.
  • Allow to rest on a wire rack for 15 minutes.
  • Fry in 350 degree oil until golden brown and cooked through.
  • Remove and drain on paper towels or wire racks and then serve immediately.

You’ll love the crispiness of this mix in all it’s fried golden deliciousness.  It’s perfectly seasoned, slightly herby, a little salty and great on both fish and chicken.  For chicken, I dip them a second time in milk and dry mix again before letting them rest another 15 minutes – it makes an extra-crispy crust!  Give it a try and stay true to the ingredients listed, Rosie would insist.  Dig in!

Crispy Hush Puppies

Fall vacations on Myrtle Beach every year make me think of one of our favorite places and their incredible hush puppies!  Since we decided to have a fish fry on a 70-degree day in February I wanted to make hush puppies for the gang to snack on.  Finding the right combination of soft, crunchy, sweet and savory can be a challenge, but I love how these turned out.  Give them a try and use them as a base recipe for other variations as well.

IMG_0573.JPG

CRISPY HUSH PUPPIES

Ingredients

  • 3 Cups Weisenberger Mills Self-Rising Cornmeal
  • 1 1/2 Cups Flour
  • 1 Tsp. Baking Soda
  • 1 Tsp. Baking Powder
  • 1 1/2 Tsp. Salt
  • 1/2 Tsp. Black Pepper
  • 5 Tbs. Sugar
  • 2 Eggs, Beaten
  • 2 1/4 Cups Whole Milk
  • 1 Medium Onion, Finely Chopped

Instructions

  • In a large bowl, mix all dry ingredients and mix well.
  • Add onion and stir to coat with dry mixture.
  • Add milk and eggs and stir just enough to mix.  DO NOT BEAT.
  • Mixture will be stiff, but should not be dry.  You can add more milk if you need it to come together better.
  • Cover mixture and place in refrigerator for at least 1 hour.
  • Using a 1/2 or 1-inch cookie scoop or a small spoon, drop hush puppy batter into 340 degree frying oil (I use a mixture of peanut and soybean).  Do not overcrowd the oil.
  • Fry for 5-10 minutes until outside is a deep golden brown and inside is cooked through.  You will need to turn them through the cooking process and may need to cut one open to be sure it is cooked through.

img_0570

These are best served immediately, but are great for another day.  Eat them plain or with butter or honey butter (1 stick salted butter mixed with 1/4 cup clover honey).  Again, this is a great base recipe that can be elevated by adding whole fresh corn or diced jalapeño.  What else do you love to flavor hush puppies with?  As for the cornmeal, I always use Weisenberger Mills from Kentucky.  You might not be able to find it in the store, but you can definitely order it online.  I swear you’ll taste the difference!  Try these for your next get together – dig in!

Cheddar Cheese Sauce

Sometimes a fat kid just wants cheese sauce on his veggies!  There, I said it.  For all the refined meals, healthy snacks and exotic ingredients there are times when you want the comfort of steamed broccoli and cauliflower smothered in rich cheesy melty goodness.  Don’t buy the awful frozen stuff from the store.  It takes just a few minutes to make my easy recipe and you’ll be good to go when you get your next craving!

img_0560

CHEDDAR CHEESE SAUCE

Ingredients

  • 2 Tbs. Butter
  • 2 Tbs. Flour
  • 1 Cup Milk (2% or Whole)
  • 6 Ounces Grated Sharp Cheddar Cheese
  • 1/2 Tsp. Salt
  • 1/4 Tsp. White Pepper
  • 2 Dashes Worcestershire Sauce

Instructions

  • In a small saucepan, warm milk over low heat.
  • While milk is warming, melt butter is a medium saucepan.
  • Add flour and stir together.  Cook over medium heat for 3-4 minutes to cook out raw flour and make a light rue.
  • Slowly pour warm milk into rue and stir together with a whisk until smooth.  Continue to cook for a few minutes until mixture has thickened.
  • Turn heat to low and stir in cheddar until melted.  Do not use pre-shredded cheese as the mixture will get too thick and won’t be as smooth.
  • Add salt, pepper and Worcestershire and stir.
  • Immediately serve over your favorite steamed veggies.

Better than a fake-cheese mess you find in the frozen section of your grocery store, this will quickly become a standard in your house.  Get your kids to eat their vegetables and enjoy the treat yourself.  Mostly, just enjoy the comfy goodness and dig in!

White Pizza Dip

Everyone loves a good hot dip for a party.  Among the buffalo dips and spinach artichoke dips of the world it’s nice to bring something different to a party.  This white pizza dip was introduced to us by our friend Mindy and we’ve been making it ever since!  It’s perfect for a mini crock, but can be doubled for a larger slow cooker and a bigger crowd.  Either way, I know this will quickly become a favorite for you and your friends.

img_0531

WHITE PIZZA DIP

Ingredients

  • 16 Ounces Sour Cream
  • 8 Ounces Ricotta Cheese
  • 1 Cup Shredded Mozzarella Cheese
  • 1 Packet Garlic & Herb Dry Soup Mix
  • 30-40 Slices Pepperoni
  • 1 Large Loaf Italian Bread

Instructions

  • In a mini slow cooker, mix sour cream, ricotta, mozzarella and soup mix until thoroughly combined.
  • Cut pepperoni slices into quarters or eighth, depending on preference, and mix into sour cream mixture.
  • Plug in cooker and allow to heat for at least two hours, stirring occasionally.
  • Cut bread into bite-size pieces and arrange in a bowl to serve.

White pizza dip is tangy and a little spicy depending on the amount of pepperoni you put in it.  Like a lot of my recipes, you can easily update it with flavors of your choice.  Go with a meatless version and add sautéed mushrooms and green peppers instead.  Try adding 8 ounces of cooked crumbled spicy Italian sausage or even ground beef and diced chopped and seeded tomatoes.  I’d like to hear what you try and what worked well.  I’m sure you’ll quickly find your favorite combination.  Dig in!!

Pork Burnt Ends

I love to grill, smoke and BBQ – even through the winter!  I’m always looking for new recipes, methods and cuts of meat to try some experiments.  Thankfully, I always have plenty of willing taste-testers.  The recipe below was inspired by one I read in The Smoking Bacon & Hog Cookbook by Bill Gillespie.  Burnt ends are traditionally beef, but I really like this take using pork.  They make a perfect dinner, appetizer or snack for the Super Bowl next Sunday!

fullsizerender-5

PORK BURNT ENDS

Ingredients

  • 3-4 Lbs. Boneless Pork Country Ribs
  • 1/2 Cup Yellow Mustard
  • Savory BBQ Rub or Any Dry Rub (I used Butt Rub on these)
  • 6 Tbs. Butter
  • 2 Tbs. Cayenne Hot Sauce
  • 1 Tbs. Honey
  • 1/4 Cup Light Brown Sugar, Packed

Instructions

  • Coat country ribs evenly with yellow mustard.  Dust liberally with BBQ rub of your choice.  The mustard will help tenderize the meat and help the rub to stick.
  • Using a smoker, charcoal grill or gas grill, cook ribs directly on the grate offset from the heat at a temperature of 250 degrees for roughly three hours or until the internal temperature reaches 170 degrees.  I used my charcoal grill, natural oak lump charcoal, this time with applewood chips for smoke.
  • Remove ribs from smoker or grill and allow to cool for about 30 minutes.
  • While the ribs cool:  In a small saucepan, melt butter and add hot sauce and honey.  Stir to combine well.
  • Cut ribs into 1-inch cubes.  Using an injector fill each pork cube.  The butter mixture will run out some, but that’s OK.  Place cubes into a shallow foil pan.  You will have some butter pool in the pan as it runs out of the pork.
  • Sprinkle the cubed meat with brown sugar and another light coating of rub.
  • Return foil pan to the smoker or grill and continue to cook on offset heat at 275-300 degrees for 1-2 more hours.  Stir every 15 minutes to evenly coat pork with rub and sauce.
  • Your burnt ends are ready when they reach your desired darkness.  Given the fat content and butter in the meat, you can create a great bark without drying out the meat.

fullsizerender-6

So this was my first run at making these and I couldn’t be more pleased with how they turned out!  You could easily finish these with your favorite BBQ sauce instead of the rub and brown sugar, but be careful of the sugar content.  It could cause them to burn quickly.  Served as a main, in a sandwich or as an appetizer, you’ll look like a BBQ pro for your family and friends.  Give them a try and let me know what you think.  Dig in!!

Mixed Potato Home Fries

I’m breaking in my new cast iron skillet lately.  I thought there was a good chance to test out the crisping capability with a batch of home fries for breakfast.  While the recipe is simple there are a few keys.  Definitely use a cast iron skillet for perfect heat and crispy edges.  Using a combo of canola oil and butter will also help to brown and flavor these.  Finally, mix it up a little bit by using both sweet and russet potatoes.

fullsizerender

MIXED POTATO HOME FRIES

Ingredients

  • 1 Large Russet Potato
  • 1 Large Sweet Potato
  • 1/2 Medium Yellow Onion, Diced
  • 2 Tbs. Butter
  • 2 Tbs. Canola Oil
  • 1 Tsp. Sweet Smoked Paprika
  • 1 Tsp. Salt
  • 1/2 Tsp. Pepper

Instructions

  • Peel potatoes and dice each into 1/2 inch cubes.
  • Put oil and butter in skillet and warm over medium heat.
  • Mix up potatoes and diced onion and then place into warm skillet.
  • Sprinkle salt, pepper and paprika over ingredients.
  • Cook over medium heat, stirring occasionally, for 15-20 minutes.  Potatoes will be soft and everything will have brown crispy edges.
  • Serve immediately.

Breakfast, brunch or dinner, these home fries will be a hit with you and your guests.  The recipe above serves 4, but you can easily double it for a larger serving.  If you like, the addition of a half red or green pepper diced in this recipe is excellent as well.  Maybe you’ll try it and use it as a base for a hash?  Try diced ham and a few fried eggs over the top.  Any way you fix it, it’ll be delicious.  Dig in!

Breaded Pork Chops

Sunday supper and football season = breaded pork chops.  My mom has made this recipe for as long as I can remember – I’ve seriously watched her make these 100 times or more!  And I have never once been disappointed in the result.  When you think breaded pork chops, you think of a crispy schnitzel or something similar.  However, the combination of frying and then slow cooking gives you soft savory no-knife-needed pork chops.  This is the ultimate in comfort food and will be part of your regular rotation for the rest fall and winter!

img_0306

BREADED PORK CHOPS

Ingredients

  • 12 Bone-In Center Cut Pork Chops (about 1/2 to 3/4 inch thick)
  • 3 Eggs, Beaten
  • 1 1/2 Cups Seasoned Bread Crumbs
  • 6-8 Tbs. Canola Oil
  • 1/4 Cup Water

Instructions

  • Preheat oven to 325 degrees.
  • Using two paper plates, creating a dredging station with beaten eggs in the first plate and bread crumbs in the second.
  • Heat an electric skillet, or a cast iron skillet on the stove top, to about 350 degrees.  Add half of the canola oil.
  • Dip each pork chop first in egg and then in bread crumbs.  Shake off excess and place in hot oil.  Brown 3-4 chops at a time.  Do not overcrowd pan.
  • Brown in oil for 2 minutes per side and place into a glass 13 x 9 baking dish.  Continue process adding more oil as needed until all chops are done and stacked in baking dish.
  • Pour 1/4 cup water into the baking dish and cover tightly with foil.
  • Bake for 2 hours at 325 degrees.
  • Serve immediately.

The simplicity of the ingredients and the slow cooking really bring out the best flavor of the pork.  The fat will render from the breading and the meat so make sure you remove the finished chops from the cooking liquid to both serve and store leftovers.  You won’t believe how tender these turn out – both for dinner and leftovers the next day!  Comfort food is served – thanks mom!  Dig in!